
Microsoft Clarity Content Insights
In this guide, I will cover an amazing feature of Microsoft Clarity that helps you understand the performance of your website’s blog section.
This feature, called “Content Insights,” provides quick insights to measure the engagement and behavioural consumption of your published content at a high level.
Microsoft Clarity is a digital experience optimization tool that assists with various tasks such as e-commerce, lead generation, and analyzing user behaviour on your website. It helps you understand how users interact with the content you publish.
As I usually do in my articles about Clarity, I aim to introduce you to my comprehensive tutorial on Microsoft Clarity (check the first link above), which covers a lot to help you get up to speed with the tool.
The “Content Insights” feature has been part of Microsoft Clarity since 2021. However, a recent update early this year has made it automatically available for most WordPress websites with a blog section. Keep in mind that the automatic implementation may not always be accurate, and I will elaborate on this further in the blog.
What Are Microsoft Clarity’s “Content Insights”?
“Content Insights” is a card available in the “Dashboard” section of Microsoft Clarity. It offers a set of metrics and insights to help you understand the reading and browsing patterns of articles on your site.
You can find the “Content Insights” card by navigating to the “Dashboard” tab and scrolling to locate the “Content Insights” section.
The “Content Insights” card includes the following elements:
- Aggregated number of sessions where your blog post was visited.
- Reader Type section: It provides insights into the amount of content consumed on your website.
- Reading Behavior: Offers insights on how the content was consumed.
- Callouts: These serve as takeaways provided by Microsoft, usually two in number or sometimes not included.
To provide a detailed understanding, let’s dive deeper into the metrics reported in the Content Insights card.
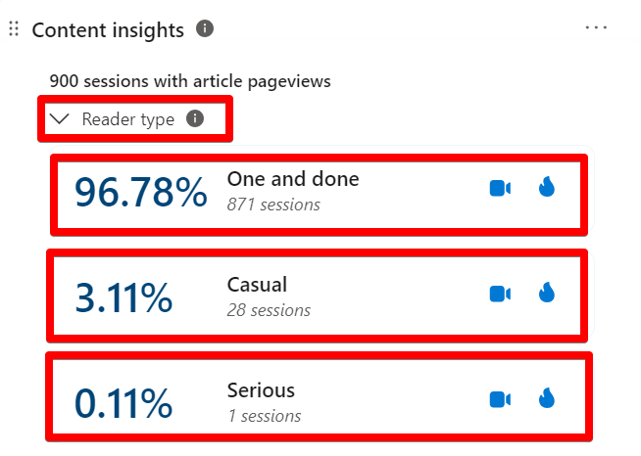
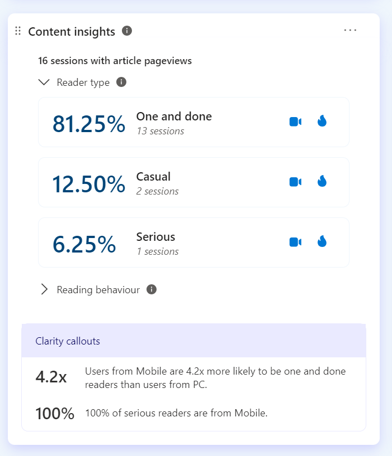
Reader Type Module
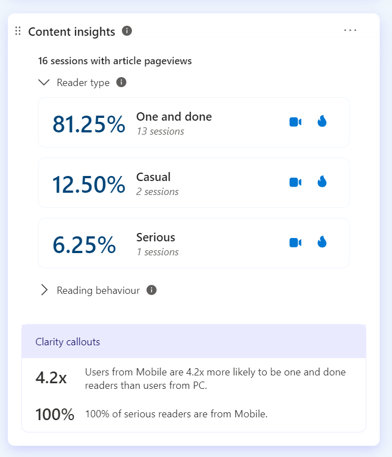
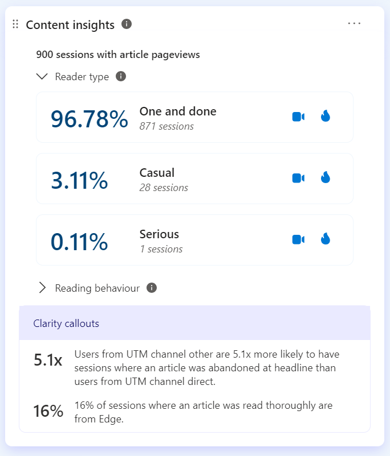
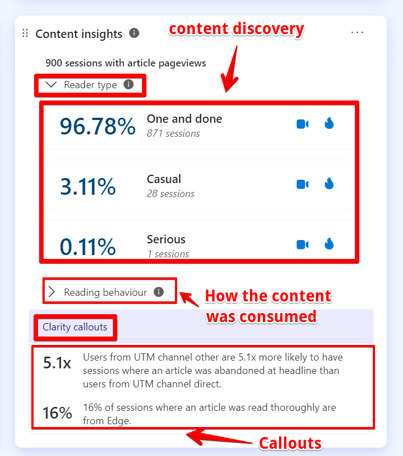
The first section of the “Content Insights” card helps you understand content awareness, which means whether your content gets discovered when you drive traffic to your website. Microsoft Clarity shows the percentage breakdown of sessions with page views on blog posts based on the number of articles viewed.
- One and Done: This metric helps indicate the percentage and number of sessions in which users viewed only one article. Your content marketing team’s goal is to reduce this number, which can be achieved by interlinking guides within the guide or in the sidebar.
- Casual: The percentage of sessions and number of sessions where users viewed 2 to 3 articles. A high number indicates that blog posts are found interesting by your website visitors.
- Serious: Determines the percentage of sessions and the number of sessions where users viewed four or more articles.
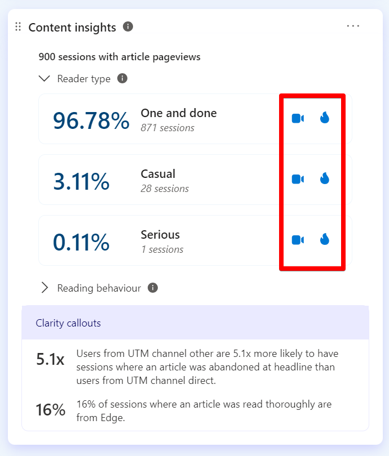
Clicking on any of the metrics under the “Reader Type” section will apply a filter to the displayed data.

You can also click on the heatmap and session recording icons to create a filter and view the respective heatmap data and session recordings for any of the Reader Type metrics.
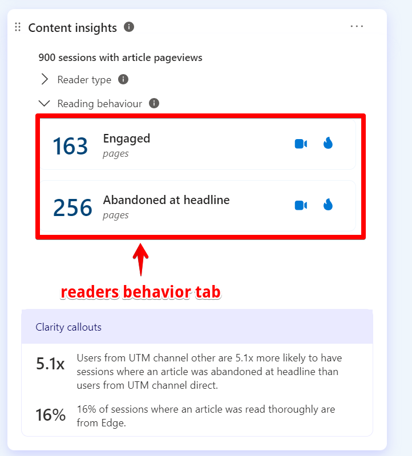
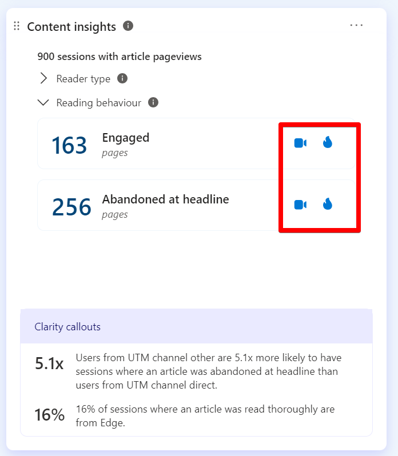
Reading Behavior Module
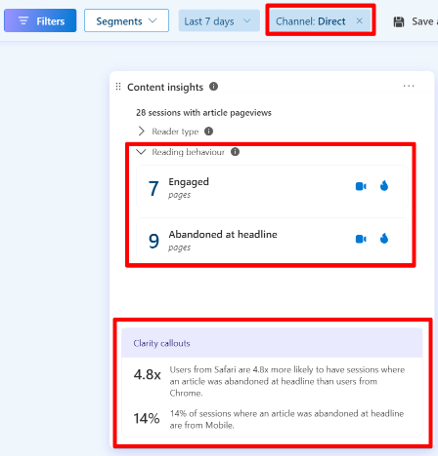
In this section of the “Content Insights” card, you can determine behavioural patterns regarding whether the content was read. Microsoft Clarity shows if your website articles were exciting or engaging based on reading behaviour.
- Engaged: Helps you understand the number of articles that were actually read. However, it does not specify if the user finished reading the article (scrolled to the bottom). During my test, I noticed that scrolling is a major driver, and the user doesn’t necessarily have to reach the 100% scroll mark. In one session, a user who scanned the blog post was classified as engaged after scrolling above 50% and spending 1 minute and 46 seconds on the page.
- Abandoned at Headline: Indicates the number of sessions where the user did not read the article but only viewed the blog post and read the headline, as described in Microsoft Clarity’s documentation.
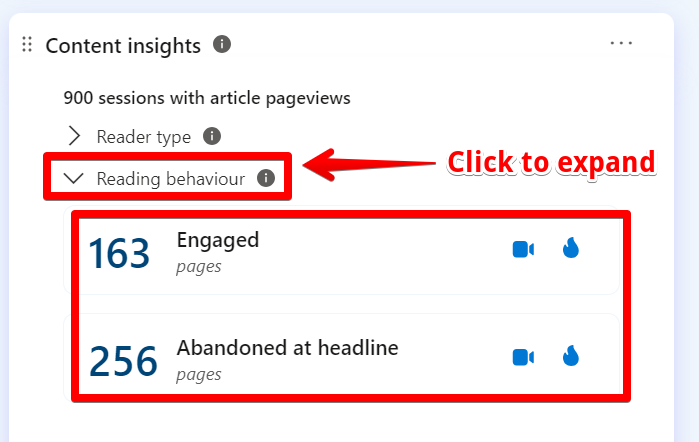
Clicking on any of the metrics allows Microsoft Clarity to filter the dashboard automatically.
You can also click on the heatmap and session recording icons to view the heatmap data and session recordings for these sessions.

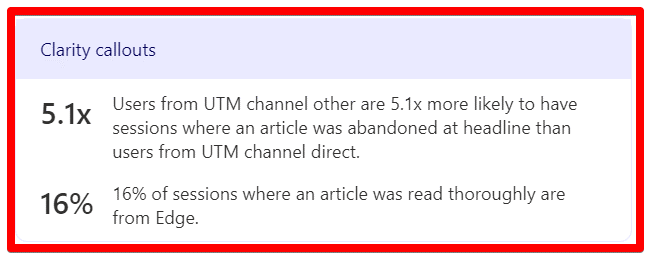
Clarity Insight Callouts
This part of the card is based on the insights Microsoft Clarity derives from your website visitors reading and viewing your blog posts, not the entire website. The insights will change based on the filters applied to your dashboard UI.
Both filters for the “Reader Type” and “Reading Behavior” can be applied manually. First, let’s cover how to set up “Content Insights” in your project to measure content performance, engagement, and consumption.
How to Set Up “Content Insights” for Your Clarity Project:
Setting up “Content Insights” is straightforward, and I’ll cover the options available depending on your website architecture.
For WordPress Websites:
If you host your website’s blog on a WordPress CMS, the Content Insights card is automatically applied to most WordPress blog sites.
The “Content Insights” card should appear in your Clarity project, as shown in the image above. If you can see the card and data, you can either validate if it’s only capturing data for your blog/article contents (which I’ll cover further in this guide) or skip ahead to the “Important Things to Keep in Mind” section of this guide.
However, if you don’t see the data in the card or the “Content Insights” card, you may need to use alternative methods discussed further in this guide.
If you’re using WordPress CMS for your blog and can’t see the “Content Insights” card, follow these steps:
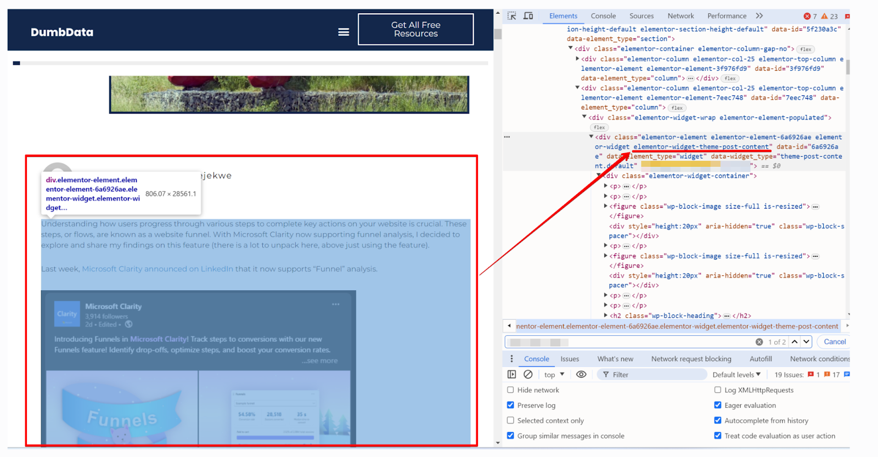
Navigate to your blog section and open a blog post. Wait until the site fully loads, and open the developer tools in your browser.
In the Elements tab, search for “data-clarity-region“, as shown in the screenshot below.
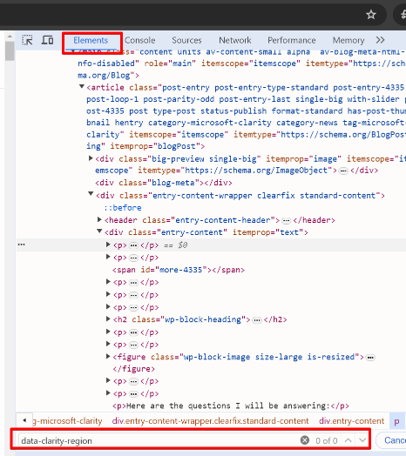
If the search returns nothing, you’ll need to implement it manually. Note that some WordPress sites with “Content Insights” activated may still not display this attribute in their code. If it does return a value, proceed with the following steps:
- Ensure the Microsoft Clarity tag is correctly installed on your website.
- Check if “data-clarity-region” is applied to an element in the blog post content div. If it’s applied, allow some time for the data to reflect. If not, additional debugging steps may be required, which are beyond the scope of this guide.
If the search for “data-clarity-region” yields no results in your code, I’ll guide you on how to set it up, even if you’re not using a WordPress website.
Manually Implementing Content Insights for Non-WordPress Websites
There are several options for manually implementing “Content Insights” for your Microsoft Clarity project, depending on your website’s architecture and development resources. The methods can be categorized into hard-coding the attribute or using a Tag Management system like Google Tag Manager or Piwik Pro. Here’s how you can approach both options:
Manually Adding Changes to Your Website:
This option requires the help of a developer if you are not comfortable making changes to your code (though it’s a simple change). Here’s what you need to do:
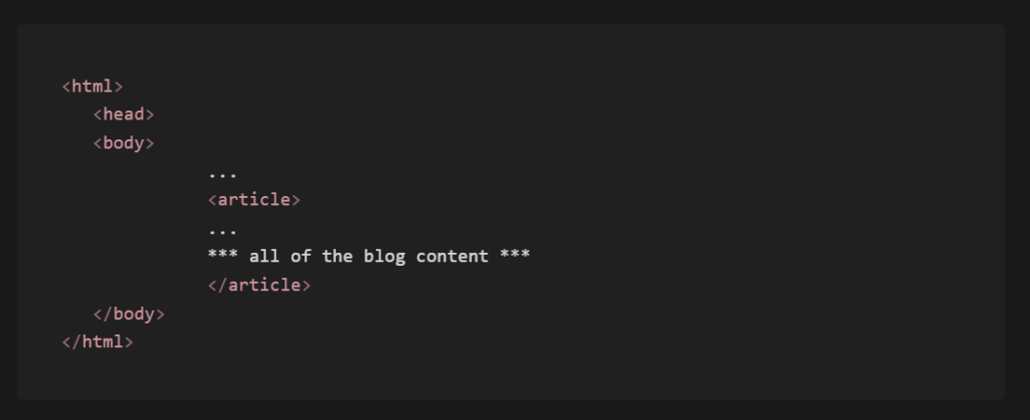
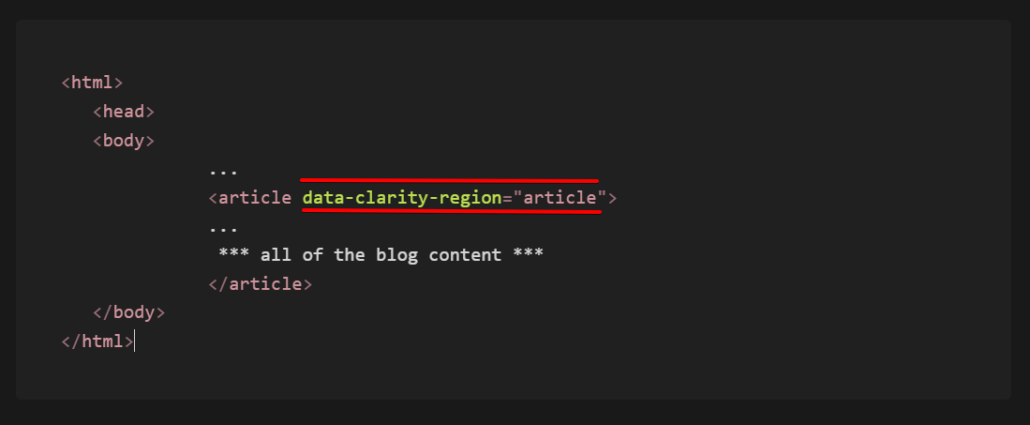
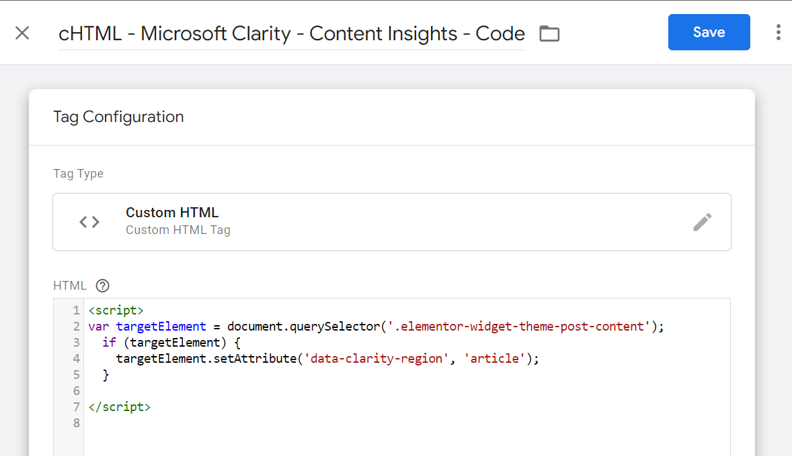
1. Identify the “article” element or tag in your blog post template code.
2. Add the following attribute: `data-clarity-region=”article” ` as shown in the image below.
Note: If your website does not use the “article” element, you can still apply the `[data-clarity-region= “article”]` attribute to the tag that wraps your blog post content. It should still work.
Once you’ve implemented the attribute, wait a few hours for the data to start populating. If your blog receives little traffic, you might need to wait longer or visit the blog posts yourself to generate data. While on the blog post, perform the same checks covered earlier.
If you do not have a developer to help you with this or you can’t do it yourself, another method is to use a Tag Manager.
Using a Tag Manager to Set Up Content Insights in Microsoft Clarity
If you prefer not to manually apply the `data-clarity-region=”article” ` attribute or need developer assistance, you can use a Tag Manager like Google Tag Manager.
The steps below depend on your setup.
Targeting the “Article” Element Tag:
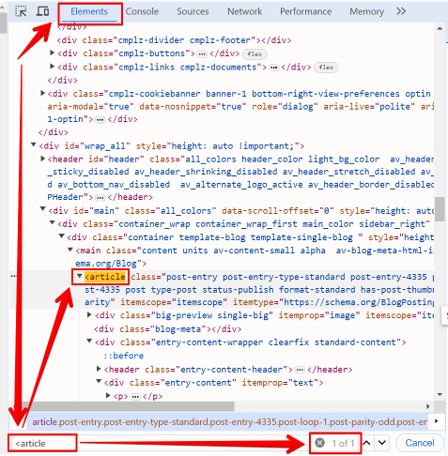
You’ll need to confirm that your blog post content is wrapped in the “article” element tag and that there are no other “article” elements on the page.
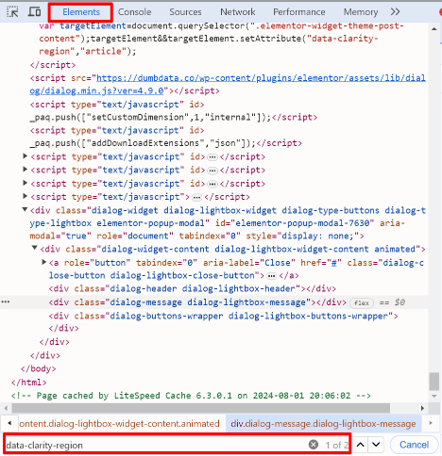
To do this, you should open the browser’s developer tools, navigate to the Elements tab, and search for “<article“. If it returns just one result, proceed with the following code.
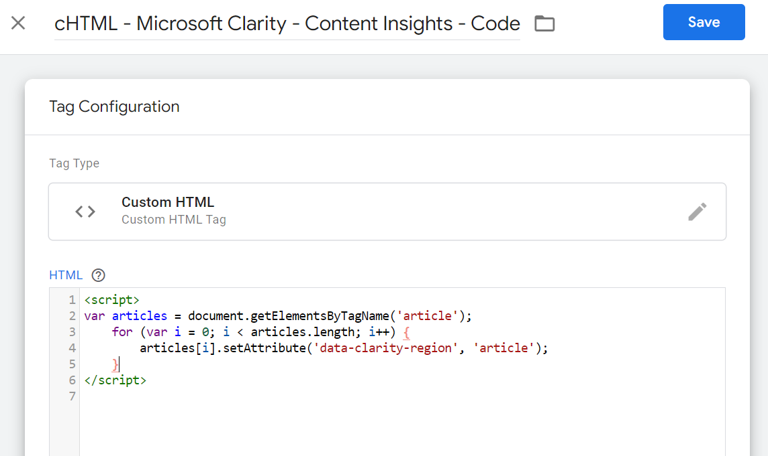
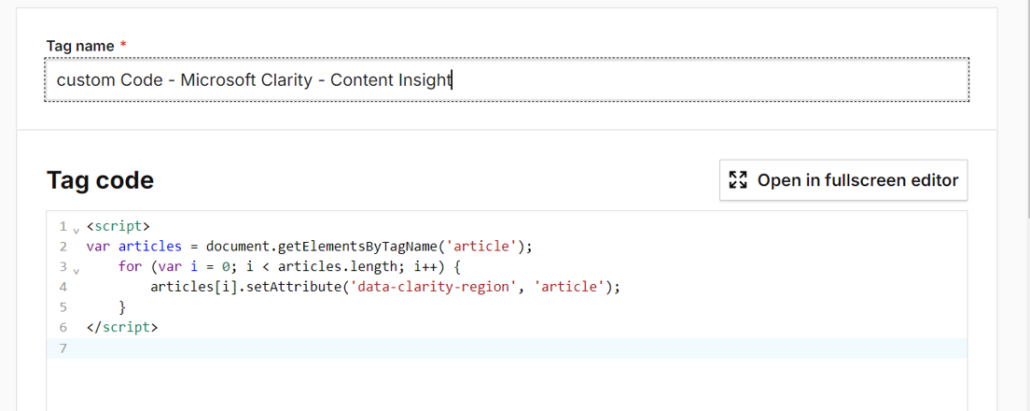
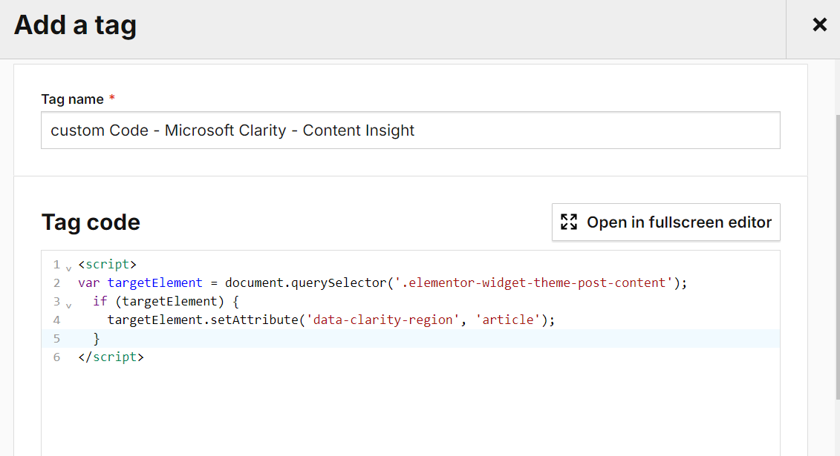
Copy the code below, and add it to Google Tag Manager or Piwik Pro Tag Manager. Trigger it on DOM ready only on your blog pages. You can use a trigger condition based on the page path for blog posts or a dataLayer variable.
<script>
 var articles = document.getElementsByTagName('article');
    for (var i = 0; i < articles.length; i++) {
        articles[i].setAttribute('data-clarity-region', 'article');
    }
});
</script>
Here’s an example of what it looks like in GTM using a custom HTML type.
In Piwik Pro Tag Manager, use a custom code tag type.
Ensure that this code is not fired on only blog post pages before the Microsoft Clarity tag.
In GTM I used the DOM Ready trigger and ensured the tag was executed before the Microsoft Clarity tracking script or tag.
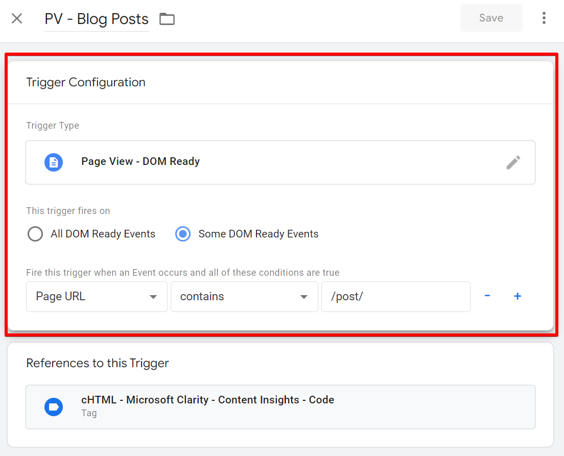
While in Piwik Pro you might have a trigger configuration like the one in the image below.
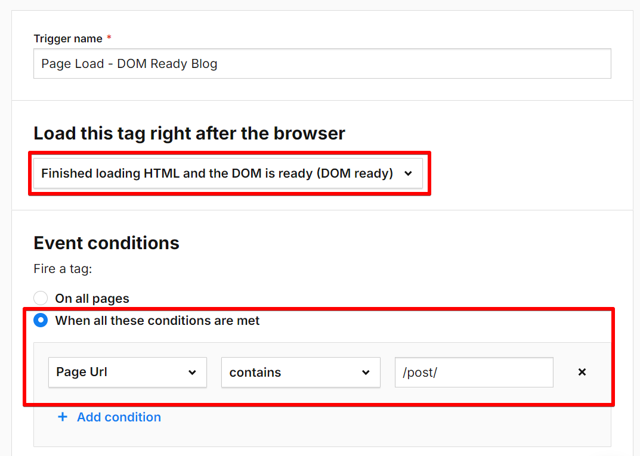
In your case, you might use a dataLayer variable in your condition over the page URL. After publishing your setup, visit your blog posts and check your Clarity dashboard for data.
Note: Even if there are multiple “<article>” elements, this approach should still work, though the data quality might be affected as the attribute will apply to all “<article>” elements.
Targeting a Unique Class for Your Article Content:
If the “article” element tag search returns multiple results, you’ll need to target a unique class for your blog post content.
1. Open the developer tools and identify a class that uniquely wraps your blog post content.
2. Replace the placeholder class in the code below with the identified class.
<script>
var targetElement = document.querySelector('<css selector>');
  if (targetElement) {
    targetElement.setAttribute('data-clarity-region', 'article');
  }
</script>
In GTM, you should have a similar setup to the one in the image below.
If you are using Piwik Pro yours should be similar to the one in the screenshot below.
Use the same trigger as described above.
One thing to note is that when using Tag Managers like GTM and Piwik Pro, you’ll see two results when searching for the “data-clarity-region” attribute: one from the code implemented in the Tag Manager and one from the site.
Using Content Insights Variables in Your Analysis & Filters
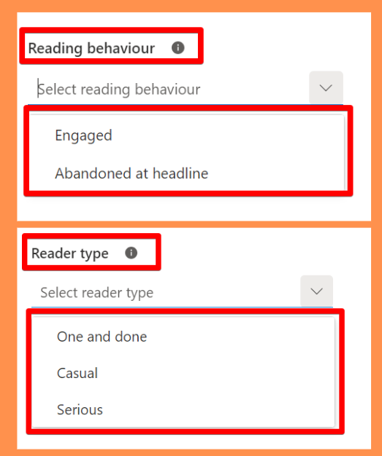
In addition to clicking on the variables in the “Content Insights” card in your Clarity dashboard (One and Done, Casual, Serious, Engaged, Abandoned at Headline), you can manually add them to your filters.
Here’s how to create a filter:
Click on the “Filter” button, and under the “User Actions” category, select the new filter options “Reader type” and “Reading behaviour”.
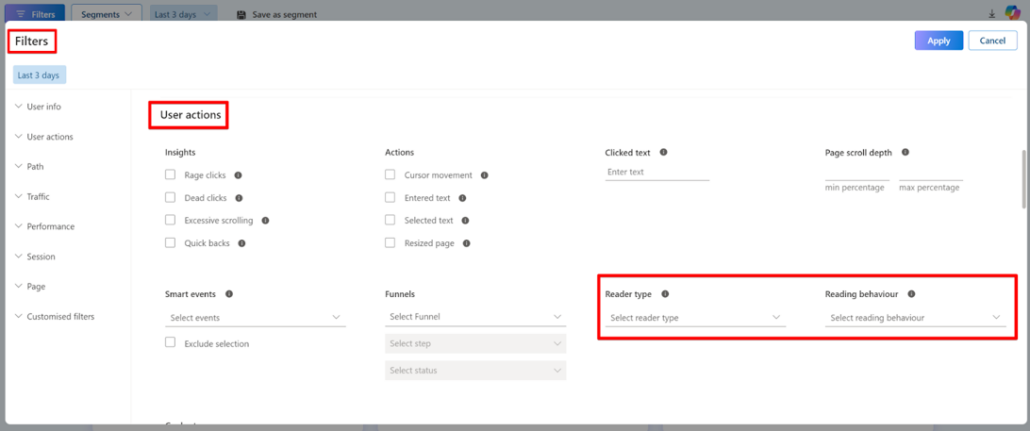
Each allows you to choose one option.
You can also save the filter as a segment for later reference.
You can also apply your own filters not using the “Reader type” and “Reading behaviour” options to see how those data points impact content consumption.
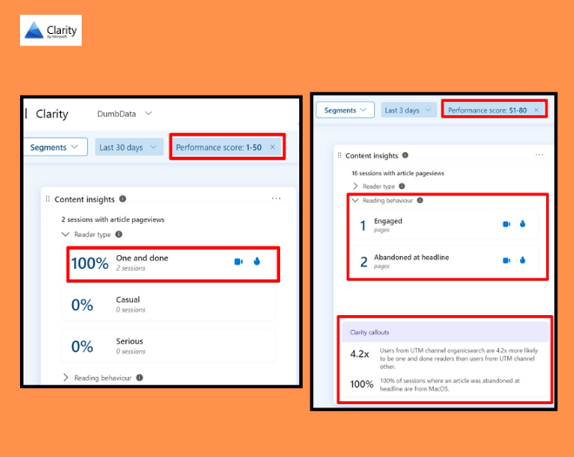
For example, you can filter by performance data points in Microsoft Clarity to see how reading behaviour and type change.
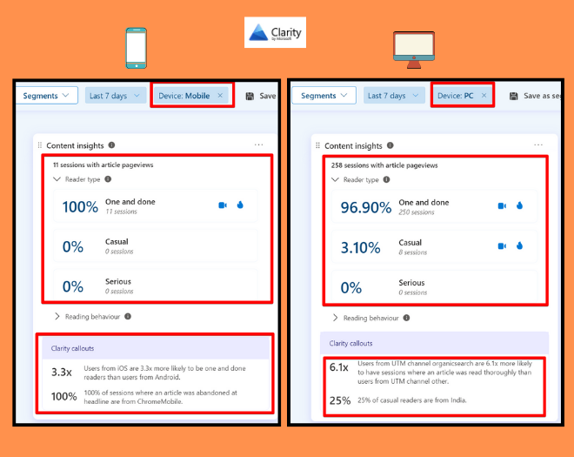
Additionally, you can filter by device category to compare mobile and desktop differences as shown in the image below.
You can also apply a filter using marketing channels, marketing regions, device technology, user type, and more.
Other Important Things to Note About Content Insights
In this section, I’ll highlight key points to consider when using the “Content Insights” feature in your Microsoft Clarity project.
Data Scopes Used
Understanding the data scopes used by the “Reader Type” and “Reading Behavior” metrics is crucial when filtering your data in Microsoft Clarity.
Reader Type: Session Scope
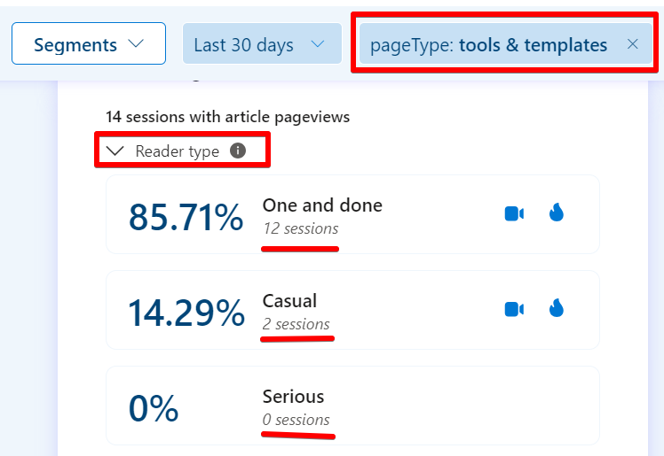
The “Reader Type” metric operates on a session scope. This means that any action performed during a session, even if it’s not on a blog post, can still be used to filter the “Reader Type” metrics.
For example, if you filter using a custom tag like “pageType” with the value “tools & templates,” it will show the percentage of sessions with different “Reader Type” actions, provided the user visited a blog post during those sessions.
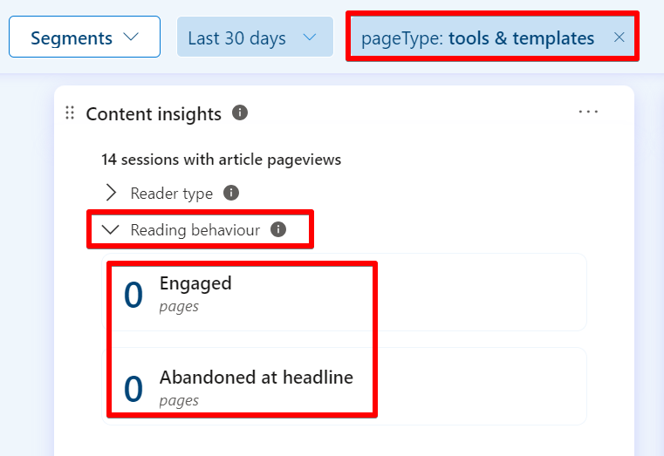
Reading Behavior: Page Scope
In contrast, the “Reading Behavior” metric uses a page scope. This means that any filter you apply must reference actions that occurred specifically on the article or blog post.
If you apply a filter that includes conditions based on actions that happened during the session but not on the blog post itself, it won’t return any data for the “Reading Behavior” categories.
For instance, applying the same filter as above will return no values for “Reading Behavior” in Microsoft Clarity.
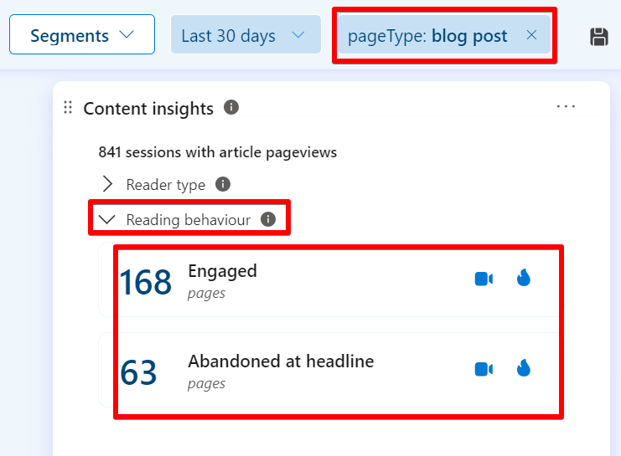
However, if you change the custom tag value of “pageType” to “blog post,” the data updates accordingly. This is because the “pageType” dimension, when set to “blog post,” only applies to blog posts.
It’s important to keep these scopes in mind when applying filters to your data. The session scope of “Reader Type” allows for broader filtering based on any session activity, while the page scope of “Reading Behavior” requires filters to be specifically tied to actions on the blog post itself.
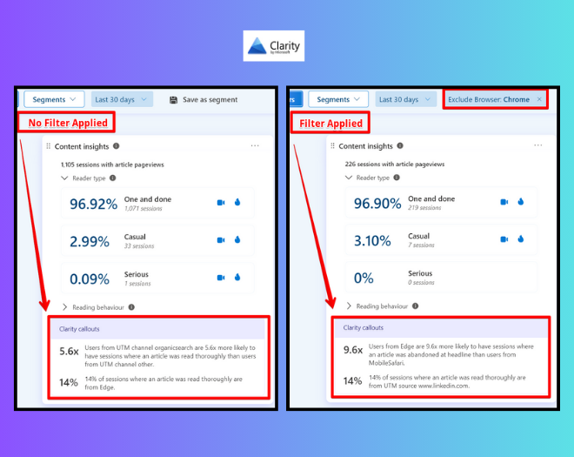
Callouts Change Based on Applied Filters:
One great feature of the “Callouts” section in the “Content Insights” card is that it adjusts based on the filters applied to your report. The image below demonstrates how the callouts change with different filters while maintaining the same date range.
Compatibility with Smart Events:
The “Content Insights” dimensions can help you understand the relationship between reading behaviour and the actions users perform on your website. In Microsoft Clarity, events can be called “Smart Events.” Here is a guide to help you understand the concept and its different types.
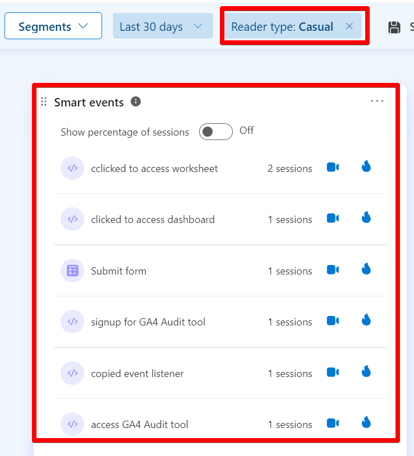
For instance, filtering by “Reader Type” can reveal events that occurred during website visits with specific reading behaviours. This allows you to observe the relationship between content consumption and key actions, such as placing an order or subscribing to a newsletter.
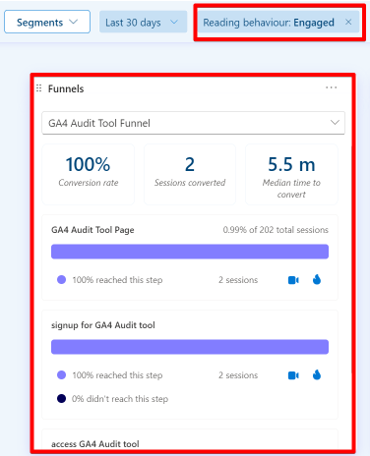
Funnels Work with Content Insights:
You can see how each “Content Insights” provides insight into whether engaged readers enter the funnels you create in Microsoft Clarity.
Funnels open many doors to optimization. If you’re unfamiliar with this feature, refer to this detailed guide on Microsoft Clarity funnels.
Applying filters related to “Reader Type” and “Reading Behavior” will show how these dimensions affect your funnel performance. This helps confirm if website visitors who read your articles are progressing through and completing your conversion funnel, even if the article didn’t directly cause the acquisition.
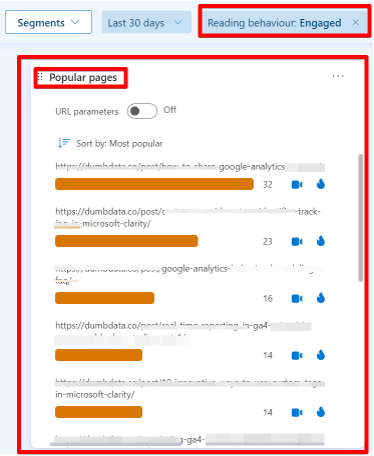
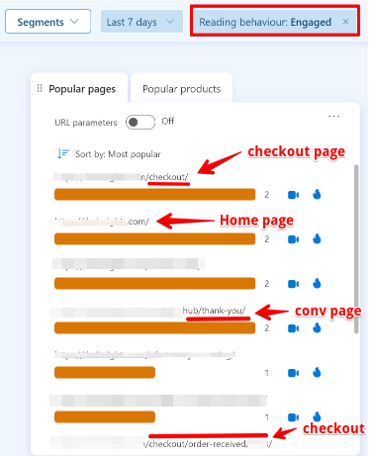
Limited Information About Individual Pages (Validate your setup):
The “Content Insights” card does not provide information about specific pages or which content pieces were abandoned at the headline. To address this, apply the filter, as shown in the image below.

Then scroll to the “Popular Pages” card in your “Dashboard” report to see which pages match the applied filter based on the “Reader Type” and “Reading Behavior” dimensions.
This method can also validate your automatic Microsoft Clarity Content Insight setups, ensuring that the content insight card accurately captures only blog post pages and not non-blog post type since “Reading Behavior” is “page-scoped.”
In a scenario where you’ve added the “reading behaviour” filter type and find that non-blog post pages are being captured, you need to either manually set up the content insights yourself or check if your trigger is executing the code on non-blog post page type, in a situation where you’ve manually set up content insights for your Clarity project.
For example, I observed that the automatic Microsoft Clarity content insights included non-blog post page types. The issue wasn’t with Clarity but because the “<article>” element also existed on those pages, so the automatic setup couldn’t determine whether it was a blog post or not.
Transparency of Engagement Calculation:
Microsoft Clarity does not provide public documentation on how it defines engagement. In some cases, a user scrolling a certain percentage down a page is classified as “Engaged”. Generally, you can consider an engaged user as someone who scrolls past the headline and spends some time reading or viewing your article.
Support for Microsoft Clarity’s Copilot:
The support for Microsoft Clarity’s Copilot with “Content Insights” appears to be partial. Based on my observations across several session recordings insights summaries generated by Copilot, there is no mention of reader behaviour or type in AI-generated summary insights by Microsoft Clarity Copilot.
However, the Callouts feature utilizes some form of AI to provide insights, though this is not explicitly confirmed.
Custom Tags & Custom IDs:
“Custom Tags” and “Custom IDs” are powerful features of Microsoft Clarity that are compatible with “Content Insights”. You can narrow the metrics reported in the “Content Insights” card by using “Custom Tags” and “Custom IDs”. However, be aware that the metric might always report 100% if the visits align with a specific reading pattern and behaviour or if the “Custom Tag” coincidentally applies to visits with a particular reading behaviour and type.
Learn more about Custom Tags and Custom IDs in Microsoft Clarity.
No Way to Disable Automatic Setups:
One feature I’d like to see added is the ability to disable the automatic setups of content insights in your Microsoft Clarity project. I haven’t checked if automatic setups are deactivated once a manual implementation of content insights is detected.
However, you can use the method discussed above to verify if content insights are correctly applied only to blog post page types.
Conclusion
You’ve now seen how Microsoft Clarity can help you understand how visitors consume articles on your website and important considerations when using this feature. If you’d like to learn more about Microsoft Clarity, check out this in-depth guide or explore how it compares with GA4 and how to integrate it with Google Analytics.
Short Bio:
Jude is an analytics specialist working with businesses across diverse industries in Africa, Europe, and North America. His passion for writing and assisting non-technical marketers to thrive in the ever-evolving realm of analytics gives him great satisfaction. He co-founded a measurement resource hub called DumbData.


")


Leave a Reply
Want to join the discussion?Feel free to contribute!