Complianz Consent Mode v2 Setup With Google Tag Manager
If you’re using Complianz for cookie consent here’s how you can configure Complianz consent mode v2 with the help of Google Tag Manager.
This instructional guide follows this previously published on Google Consent Mode v2, including the differences between “Basic” and “Advanced” consent mode.
Read on below or jump to a specific section in the table of contents.
Table of Contents
- Consent mode overview
- The Complianz CMP
- Configure Complianz for consent mode
- Configure Google Tag Manager for consent mode
- Wrapping up
A Quick Note About Consent Mode
Consent mode was first released by Google in 2020. Google released Consent mode v2 in November 2023. Both consent modes deal with how a website receives tracking consent choices from visitors and then shares those choices with Google so that tags can update how they collect and process data.
Consent mode deals with cookies for GA4 and advertising cookies for Google Ads.
Consent mode itself doesn’t provide any kind of cookie consent banner. For that you need to use a Consent Management Platform (CMP) like Complianz, or another custom solution. The CMP is what collects the consent choices and communicates them to Google.
The Complianz CMP
Complianz is a consent management platform built for WordPress sites. It is one of the 18 “Google CMP Partners” that integrate with Google Consent Mode.
Complianz is the CMP running on this website. I’ll be creating some future resources about using Complianz to set up tags that honor consent choices. Google put together this CMP comparison guide if you’d like to do more research on what might be best for your situation.
To follow along with the rest of this consent mode tutorial you will need to have Complianz already running on your WordPress site.
Here’s what you need to configure within the Complianz plugin.
Configure the Complianz Plugin for Consent Mode
To configure Complianz for consent mode you’ll make changes to your “Statistics” and “Statistics configuration” settings. But first, check out which regions you’re targeting since there are different rules across geographies for how consent signals will be processed.
Review Regional Targeting
During the initial setup process you will have selected which regions you target with your website.
You do this in Wizard –> General –> Visitors as you can see below.
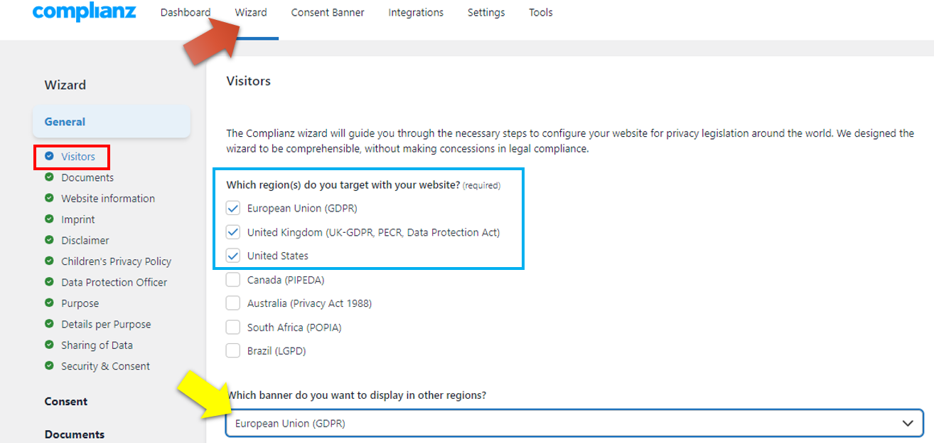
Your site will show a different cookie banner for countries covered by GDPR vs. countries that are not. And as such your visitors will have different choices to make that will be automatically communicated to Google. If you aren’t using a CMP like Complianz and you are using Google Tag Manager for consent mode, you’ll need to do some of this work manually.
Reminder: Make sure you choose which cookie banner you want to show in other regions that you are not targeting. A GDPR compliant banner like the choice made above at the yellow arrow will be an “opt in” banner. Other countries may have an “opt out” cookie banner.
Update Complianz Statistics Settings
Confirm that you compile statistics (web analytics data) on your site.
Go to Wizard –> Consent –> Statistics.
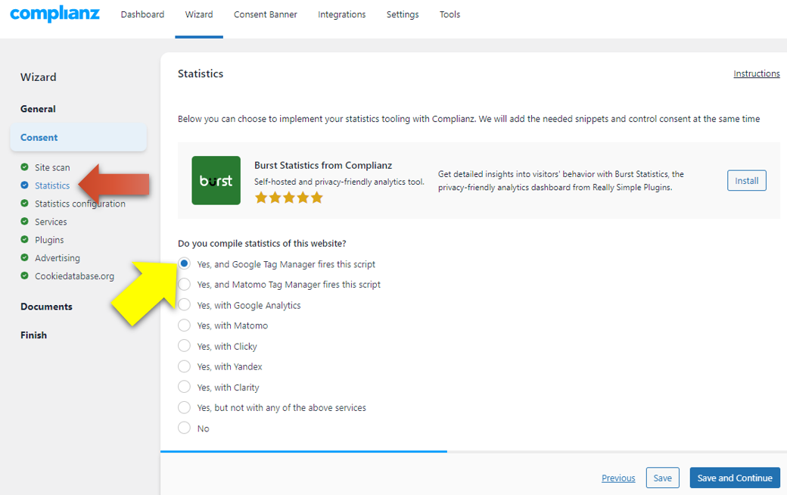
Since we’re setting up consent mode with Google Tag Manager, answer with the first radio button as shown.
Then, click “Save and Continue.”
Update Complianz Statistics Configuration Settings
Now, make more specific choices as it relates to consent mode.
Go to Wizard –> Consent –> Statistics configuration.
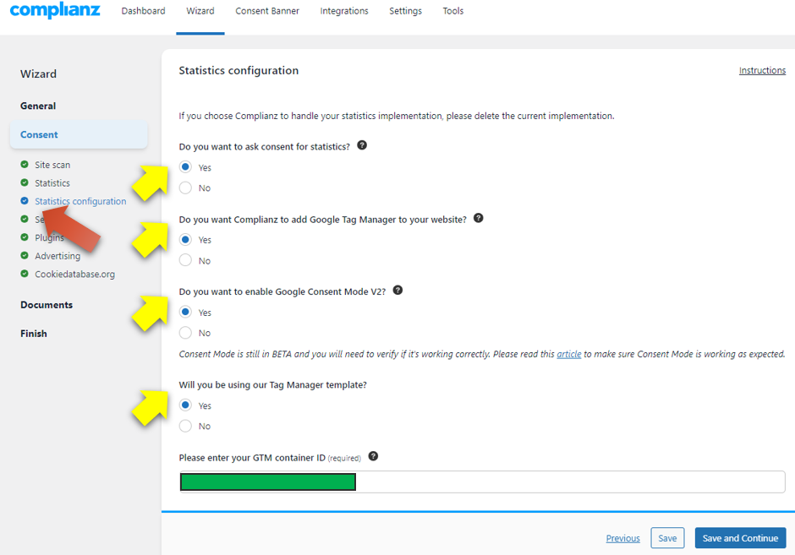
Make the following “Yes” choices on the radio buttons shown above at the yellow arrows.
- You must ask for consent for statisitics
- You will use Complianz to add Google Tag Manager to your website
- You must enable Google Consent Mode v2
- You should use the Complianz Tag Manager template if you’re following this guide
Then, in the green rectangle space above, add your Google Tag Manager container code. Click “Save and Continue.” Note, the default consent behavior for Complianz and Tag Manager is to use the “Advanced” version of consent mode.
Configure Google Tag Manager for Consent Mode
Then, head over to tagmanager.google.com and access your container that is connected to your website. This must be the same container as the ID you entered in the Complianz wizard immediately above.
We’re going to create a new tag for Complianz that comes from the community gallery. Then, we’ll pair it with a trigger so that the tag fires on “consent initialization.” Let’s start with creating the tag.
Create the Complianz Tag
Click into “Tags”
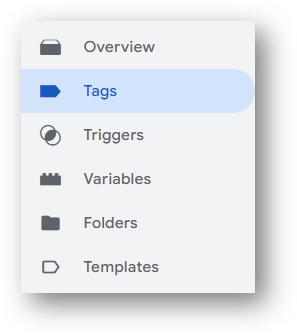
Click “New” to create a new tag.

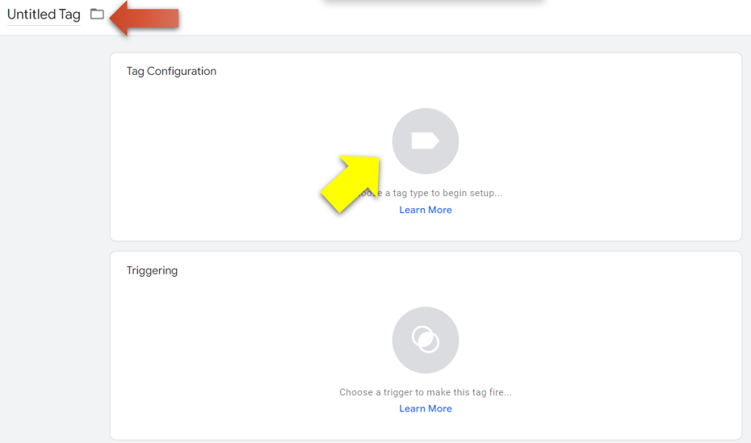
Give your new tag a name. Something like “Complianz – Consent Mode” works great. Then, click into the “Tag Configuration” area by the yellow arrow to choose a tag type.
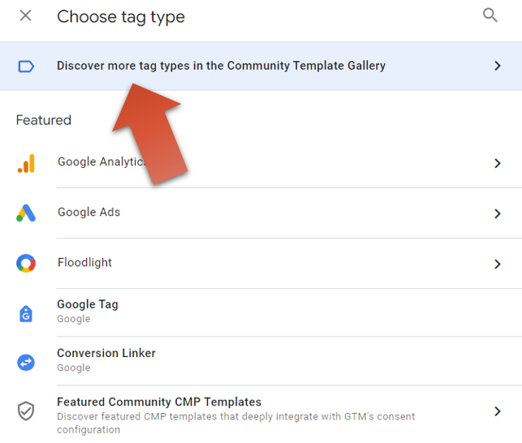
Click to “Discover more tag types in the Community Template Gallery.”
Note: The community gallery has templates created by third party developers (like Complianz) for tags and variables.
Click the magnifying glass icon to start a search.
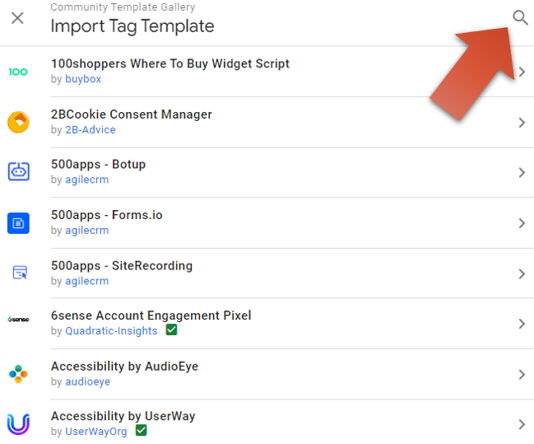
Then, type “complianz” and choose the “Complianz.io” tag template when it appears.
And add it your workspace.

You don’t need to make any changes to the basic tag configuration. But you have the flexibility to do that if needed.
Configure Complianz Consent Mode Tag
Your tag looks like this.
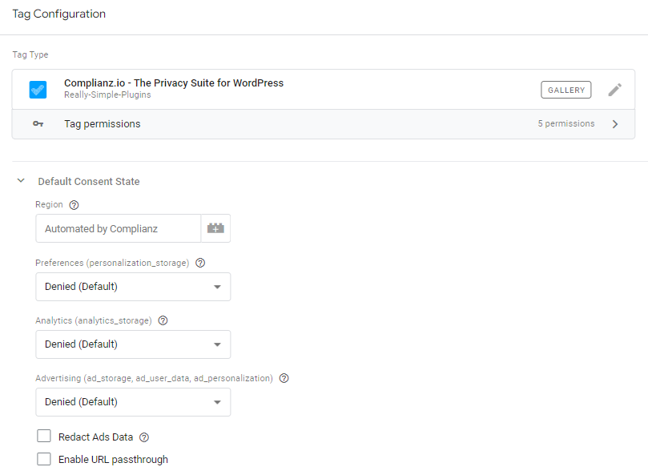
Here is what those options mean in the default consent state:
- Region: By default, this will be automated based on the the regional targeting decisions you made in configuring Complianz in WordPress.
- Preferences (personalization_storage): A “privacy parameter” that Google says “enables storage related to personalization e.g. video recommendations”
- Analytics (analytics_storage): This is what determines whether consent mode gives permission for statistics, like Google Analytics. If you always wanted Google Analytics to run (note, you should have a legal basis for doing so), you could change the default and it would act as though consent was always given for statistics.
- Advertising (ad_storage, ad_user_data, ad_personalization): This controls advertising permissions, like for Google Ads tags.
- Redact Ads Data: When this is checked, additional data will be removed when advertising consent is not given.
- Enable URL passthrough: When this is checked, Google advertising campaigns through Google Ads and DoubleClick will be able to pass some tracking information across pages even when advertising consent is denied.
Some quick notes about those last two.
A Note About Redact Ads Data and URL Passthrough
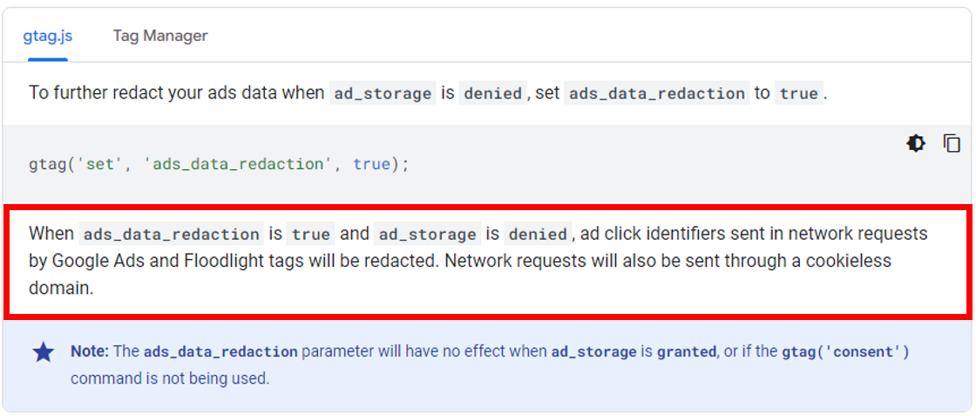
Here’s what Google says will happen if you toggle on redact ads data and ad_storage is denied.
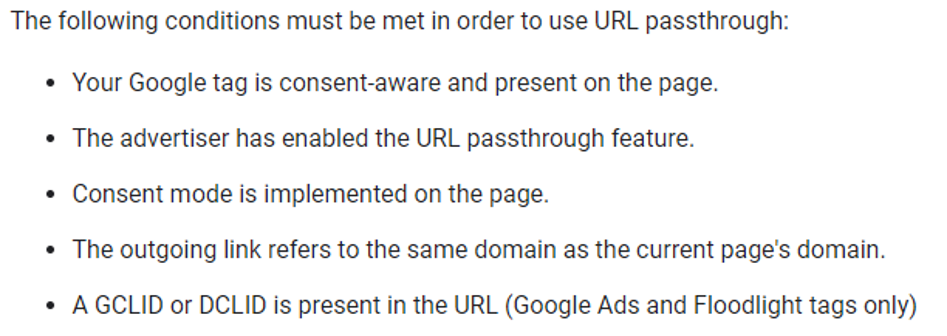
And some additional notes (also from Google) about what conditions must be in place in order to use URL passthrough.
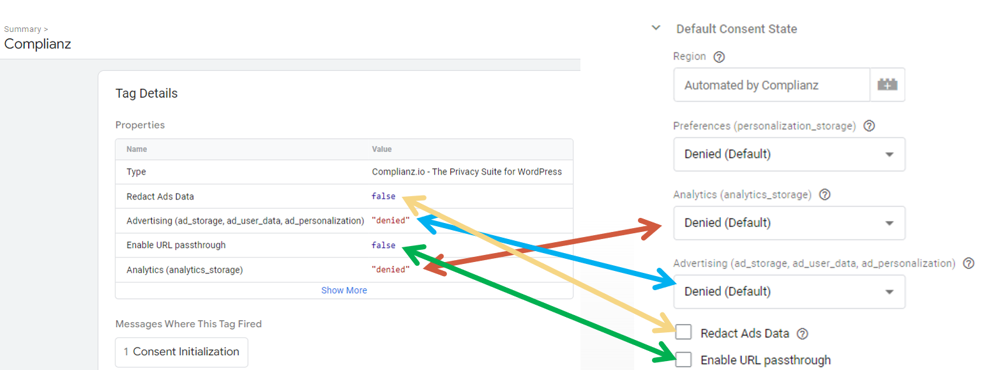
Here’s what it looks like when you test your tag in that default state. Remember, Complianz will send consent signal updates to Google Tag Manager based on decisions your visitors make.
Now you need to add a trigger to tell your tag when to fire.
Add A Trigger to Your Complianz Tag
Click into the “Triggering” area below your new tag.
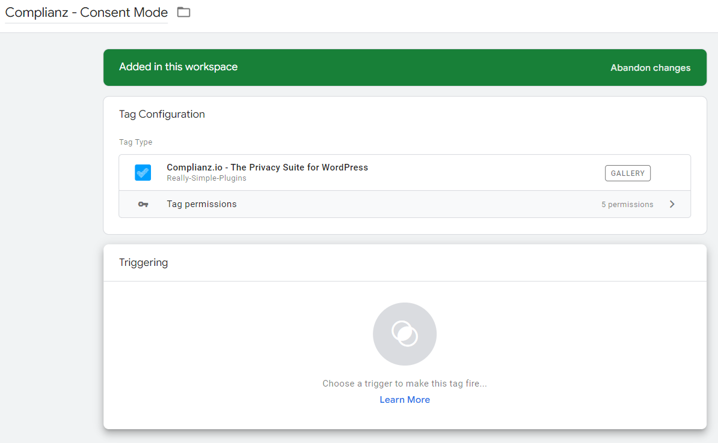
You should see a trigger called “Consent Initialization.” Choose it.
Consent initialization is the very first trigger that will fire in your Google Tag Manager container. Setting your consent mode template tag to fire on consent initialization ensures that consent mode is active and able to provide direction to Google tags.

Here is what your tag and trigger combination look like.
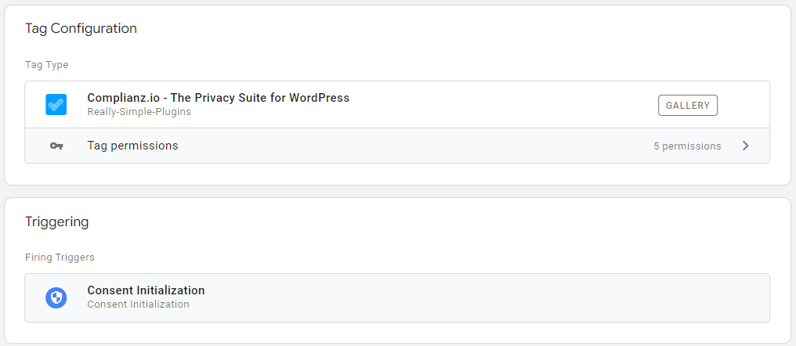
Now, save your tag. You can go ahead and publish your container to make everything live. If you want to test and debug everything first, this guide is a great resource.
Wrapping Up
You made it to the end!
For more like this, you can sign up for the free monthly newsletter. Thanks for coming by.





uhm, the template does not exists in GTM, how is it possible?
They already fixed that option. Just checked and implemented Complianz on our website upstaff.com
Hey, awesome. Thanks for confirming this, Dmytro.
Hmm…have you checked recently? I recently did and still see it there when I use the search function.
Hello hello
Isn’t it better to fire the tag on “Consent Update” instead?
I guess in “Consenti Initialization” there is no consent state (not available I mean) while in consent update there is and it can be either “denied” or “granted”.
By doing so it should record correctly any change in the state of the consent across the different pages.
WDYT?
After installing the ComplianZ plugin and configuring it to place my GTM container, I get an “Urgent Error” in Tag Manager that reads “Tag not placed correctly – Your tag may be installed too low in the page, which can impact performance.” ComplianZ support have failed to help and they actually brought the eCommerce site down when troubleshooting. Really poor experience so far.
Ugh, that sounds horrible. Thanks for sharing this. For what it’s worth (not much), I think that Google may be overly dramatic sometimes with the “tag not placed correctly” messages. They want GTM to be the very first thing on a page so it can load first and gather all the data. And rightly so. But I think the data loss from a tag deployment that is slightly lower will only be from the visitors that leave soveryfastthatnothingloads, which should be a small fraction. Of course, you do still want to capture those people (mostly so you can see if / when your engagement rate is dropping), but figured I’d share just in case any of that is new info.
is this tutorial for the free version of Complianz?