GA4 Custom Dimensions: How to Set Up and Use in 6 Steps
UPDATED: 2/10/25 In Google Analytics 4 you need to register new event parameters as custom dimensions in order to see the data in all of your GA4 reports. Learn what that means and how to make it happen.
GA4 custom dimensions were the single most confusing part about GA4 when I first tried learning the platform. That extra step of registering event parameters as custom dimensions is not intuitive. But once I understood them, the rest of GA4 event information began to make more sense. We’ll go through the process in 6 steps.
Let’s go through the process to register some event parameters as GA4 custom dimensions. We’ll start by understanding event parameters.
1.) Understand the Difference Between Events and Event Parameters
The Google Analytics 4 data model is based on events. Website interaction data like clicks and page views and purchases are all events.
And all of these event types include at least some event “parameters”.
What Are Event Parameters?
Event parameters are additional pieces of data that help provide more information about your events.
As an example, let’s imagine you set up a new custom event to track all of your internal link clicks. [Which you might do because the built-in GA4 click event will only track external link clicks.]
Your custom event will keep count of how many times internal links are clicked. But you probably would want to know what specific links are being clicked, wouldn’t you? For that you need an event parameter.
The specific URL of a link that is clicked would be a useful parameter to include with an event that simply recorded how many times a link was clicked. Without the event parameter showing the URL of the link click, the event alone would only count how many total times links were clicked.
And as we’ll see, we can register that event parameter as a custom dimension in order to access it in our reports.
Note: For the rest of this blog, we’ll assume we already have a custom event created.
2.) Access the GA4 Event Tag in Google Tag Manager (GTM)
From tagmanager.google.com, we have clicked into our Internal Link Click tracking GA4 tag. As you can see below, there are two event parameters in the red box that are getting passed along every time our event tag named ‘internal_link_click’ fires.
The first parameter is link_url, which will show the specific link that was clicked. The value of the event parameter is {{Click URL}}, with those double curly brackets (curly braces) representing a variable value that will change as different links are clicked. The second parameter is link_text, which will return a variable value of the specific text of the link that is clicked.
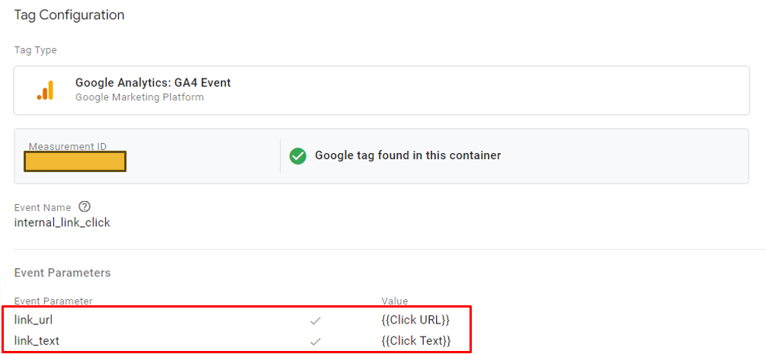
You’ll need to register these event parameters as custom dimensions in GA4 if we want to see them in your standard reports. Now, let’s head on over to our GA4 property.
3.) Go to GA4 Admin Section and Click “Custom definitions”
From GA4, click into your admin settings with the gear icon in the bottom left of your screen.
Then, click “Custom definitions” within your property setting. You can find custom dimensions in two places as shown below.
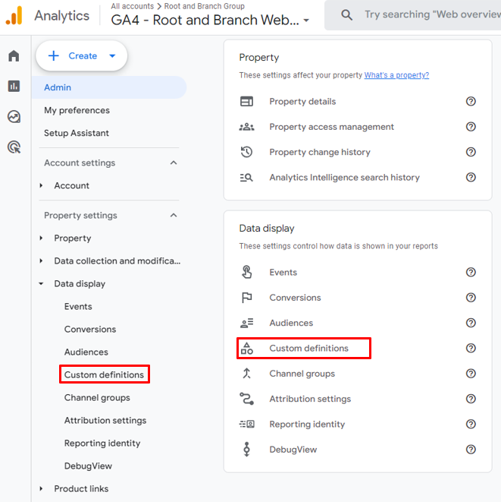
Custom definitions include both “custom metrics” and “custom dimensions”. We’ll be creating a new custom dimension here.
4.) Add a New Custom Dimension
At the top right of your screen you’ll see a blue button to “Create custom dimensions”. Hit that button.

5.) Create Your New Custom Dimension
There are 4 fields to fill out when you register your event parameter as a custom dimension.
- First, give your dimension a name. You can see this in the green box below. The dimension name is what will show up in your reports, so make it memorable and use a consistent naming convention.
- Second, identity the scope of your dimension. Scope is either “event” or “user” and refers to whether the event parameter describes an action that was taken (an “event scoped” dimensions) or the user who was taking the action (a “user scoped” dimension). In this case, our parameter is event scoped as it describes the link that was clicked.
- The third field is the description. This is shown in the blue box below and is optional. Consider it your personal note only.
- The fourth field is the most critical. In the red box, you can see the event parameter. In the case of GA4 custom events and their associated parameters, the event parameter field must be typed exactly as it is in the GA4 event tag you’ve created in Google Tag Manager.
In our case, the event parameter for the link URL of the internal link click is link_url. Scroll back up to step 2 and you can see this in the GA4 event tag in the event parameters.
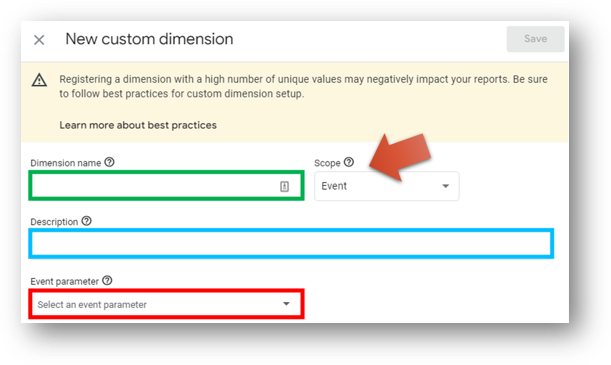
Now, hit the blue button to “Save” your GA4 custom dimension.
Repeat the process for any additional event parameters you need to register.
A Note About Dimension Quotas
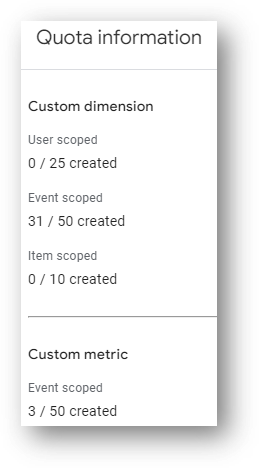
You can have up to 50 event-scoped custom dimensions in your GA4 property. You can have 25 user-scoped custom dimensions and 10 item-scoped custom dimensions. If you click the white “Quota information” button that is shown two images above, you’ll be able to see how much of your quota you have used.
6.) Review Your Custom Dimensions
After registering your event parameters as custom dimensions you will be able to view this event parameter data.
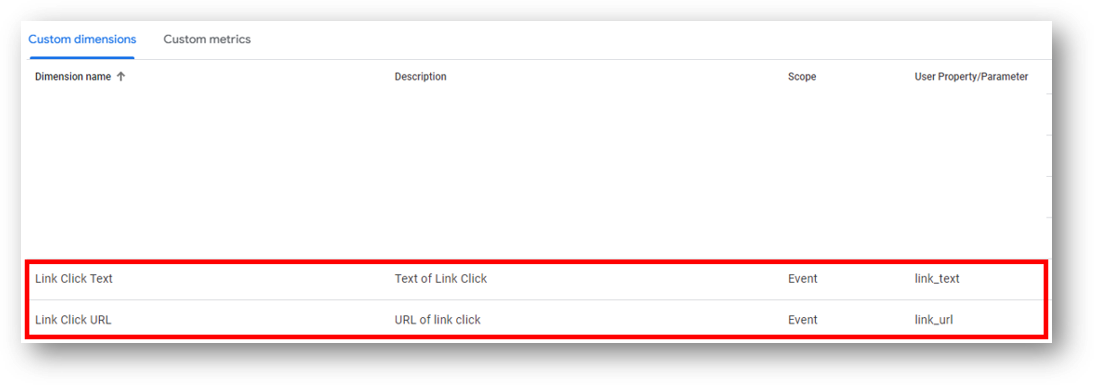
You can see below the 4 fields we had filled out for our two custom dimensions.
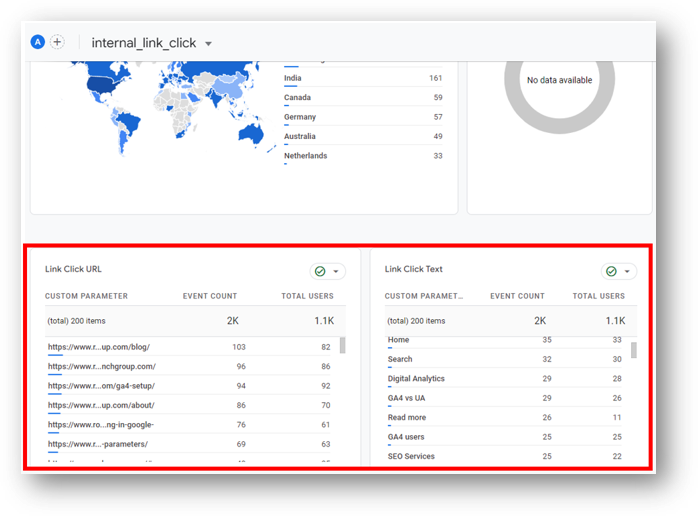
Now, when you click into your custom event in your standard reports you’ll be able to see two new cards showing your event parameter data. Prior to registering those event parameters as custom dimensions, you won’t see these cards at all.
Note: Here’s a reminder of how to get to this screen: Life Cycle reports -> Engagement -> Events -> click on your internal_link_click event
I hope you found this helpful. You can do other fun things with custom dimensions and event parameters with the session_start event and the view_search_results event.
Wrapping Up
Root and Branch believes we can make smarter and better decisions with good data. Digital analytics is more than mere data collection and requires thoughtful analysis and good decision making. You can learn more here.
Thanks for reading and have a great rest of your day.





Great post thank you. I am going to have to dig into the “user” vs “event” scope as that seems a bit unclear by Google.
Totally agree with you, Nick. These scopes seem pretty opaque at first. Here’s a quick summary below with some examples of each. Hope it helps!
EVENT SCOPED:
An “event-scoped” dimension describes the action someone performs. Event-scoped dimensions come from event parameters that are sent with events.
The value of an event-scoped dimension often changes as someone engages with your website.
USER-SCOPED:
A “user-scoped” dimension describes the person who is performing the action. User-scoped dimensions come from user properties.
Examples include geography, gender, language, and country. The value of a user-scoped dimension should change very rarely.
Hi
What would cause me to have 10k events but only 6k of certain event parameters, when all events have all parameters?
It would depend on what event parameter you’re referring to. Not all events have all event parameters. For example, the link_url event parameter (showing the clicked link) goes with the click event, but not others. If you can share more context I can try and think a bit more.