GA4 Page Timer Tracking: 2023 Guide
GA4 page timer tracking involves both Google Analytics 4 and Google Tag Manager. This guide will walk you through the entire process if you want to track page timing on your site.
Before we get started let’s make sure we have the ingredients we need for success. There are just 2 of them.
Do you have Google Tag Manager successfully installed on your site? If you don’t (and you have a WordPress site), this GTM install tutorial will help get the job done quickly. I’d also recommend reading about how tags and triggersGoogle Tag Manager Basics: Master Tags and Triggers work.
Do you have GA4 successfully installed as well? If not, this linked 5 minute installation guide will get you straight.
With that out of the way, read on below for a review of the major steps to create your timer trigger, your GA4 event tag, and to see your page timer data in GA4. Or, watch the embedded video to see every single click.
Know What You’re Creating in Your GA4 Event Reporting.
Once we’re done, you’ll see a new ‘timer_1min’ event in your standard GA4 event reporting. If you want to track a different time duration (10 minutes, 10 seconds, or anything in between), you’ll of course see a slightly different event name.
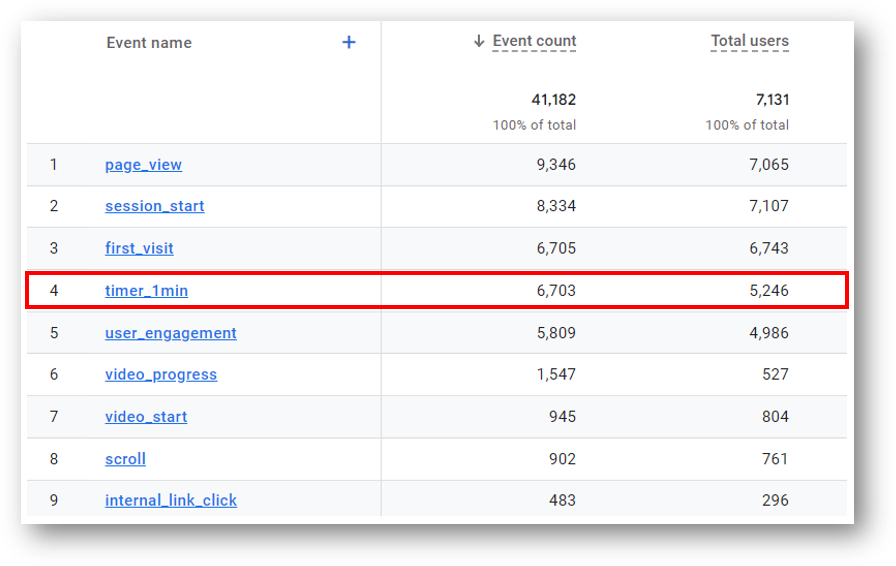
You can navigate to this report by going to Engagement and then Events in GA4. To get page level insight, you’ll have to create a custom Exploration which we’ll get to down below.
Create Your Timer Trigger in Google Tag Manager
Now, head over to Google Tag Manager at tagmanager.google.com.
Go to “Triggers” in the left-hand navigation and hit the blue “New” button to create a new trigger.
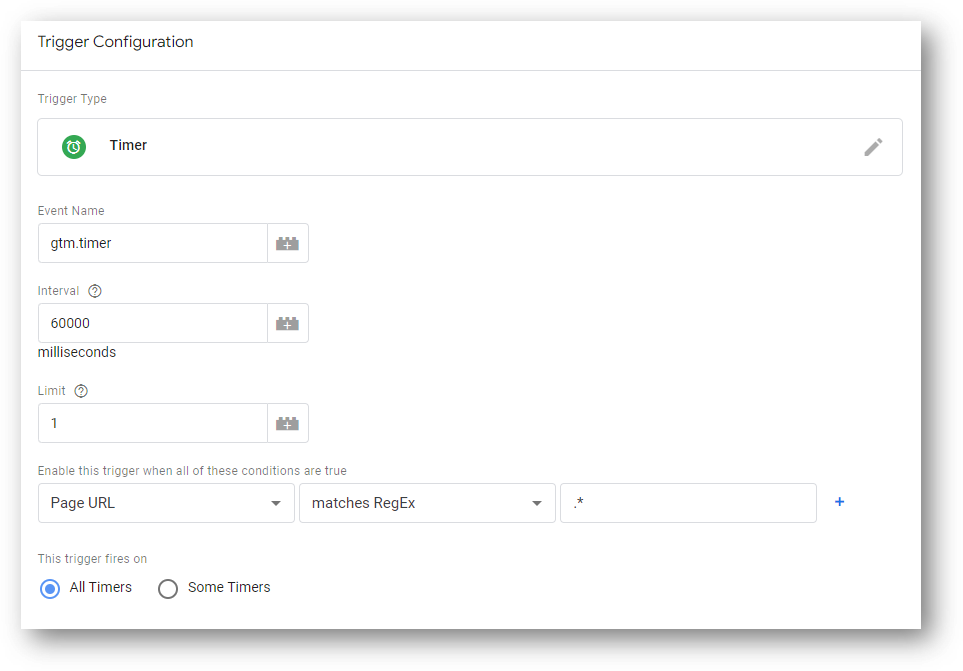
For “trigger type” choose the Timer.
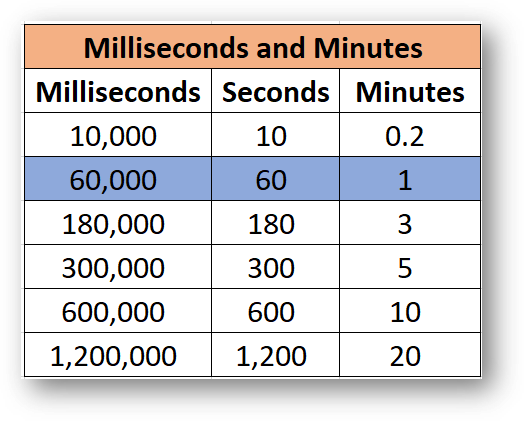
Your “Interval” will be the amount of time that needs to elapse before your Timer Trigger fires. This time is in milliseconds. So for a 1 minute timer, enter 60,000 as you can see in the configured Trigger below. If you want your Timer to fire at a different time, adjust your Interval accordingly. Here’s a reference for you.
Set your Limit to 1. This will only allow your timer trigger to fire 1 time at the targeted interval.
Finally, set your trigger to fire on all pages. You can do this by setting the Page URL to match the Regular Expression (RegEx) of .*.
Save your trigger.
Now that your trigger is ready, you will need to create a GA4 event tag to pair it with.
Create Your GA4 Event Tag for Your Timer in Google Tag Manager
Select “Tags” from the GTM left-hand navigation. Hit the blue “New” button to create a new tag.
You’ll want to create a GA4 event tag as your Tag Type as you can see below.
In the space for “Configuration Tag”, you should be able to select the GA4 property that you’ve already set up. If you haven’t installed GA4 through Google Tag Manager, you can manually enter your GA4 measurement ID here.
The “Event Name” will be the name of the event that shows up in your GA4 reports. Check the first image in this guide if you need a reminder. This example is for a 1 minute page timer trigger, which is why I’ve named it timer_1min. Whatever you decide to name yours, I’d recommend sticking with lowercase and avoiding spaces.
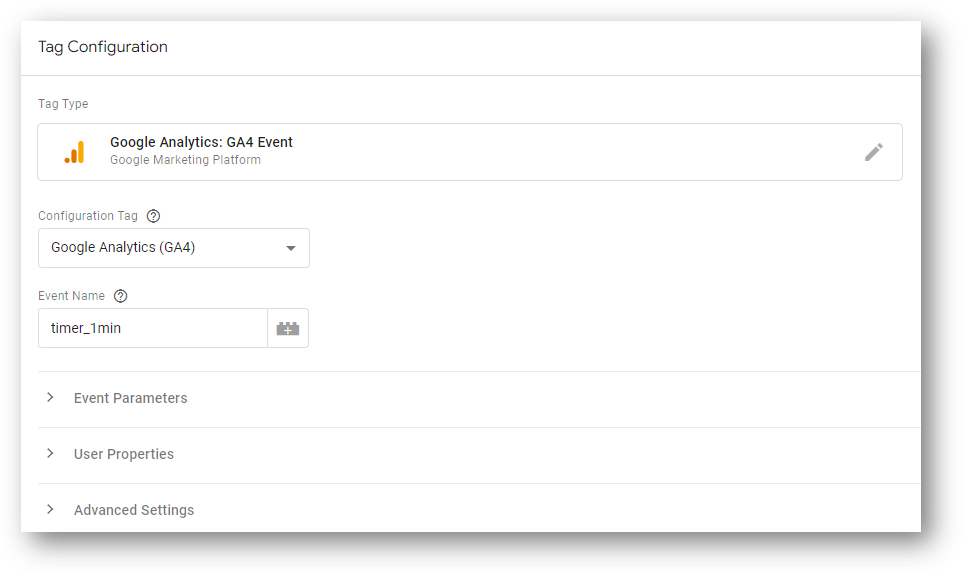
Save your GA4 event tag and set it to fire by pairing it with the timer trigger you created in the step above.
Test Your New Trigger and Tag
You can test to make sure things are working properly by opening Preview mode in Google Tag Manager as shown in the video embedded at the top of this guide. You can also use DebugView in GA4 if you want to be extra certain.
Once you’re confident that your tag is working, publish your GTM container to set your changes live!
Create a Custom Exploration in GA4 For Reporting
The standard report shown previously in this guide is helpful in showing the total number of times your event tag has fired. However, this is not incredibly useful. For timer insights to be actionable we really need to know page level data.
That’s where the Explorations tab in GA4 comes in. The embedded video shows the step by process to select the proper dimensions and metrics to build a report exactly like the one shown below.
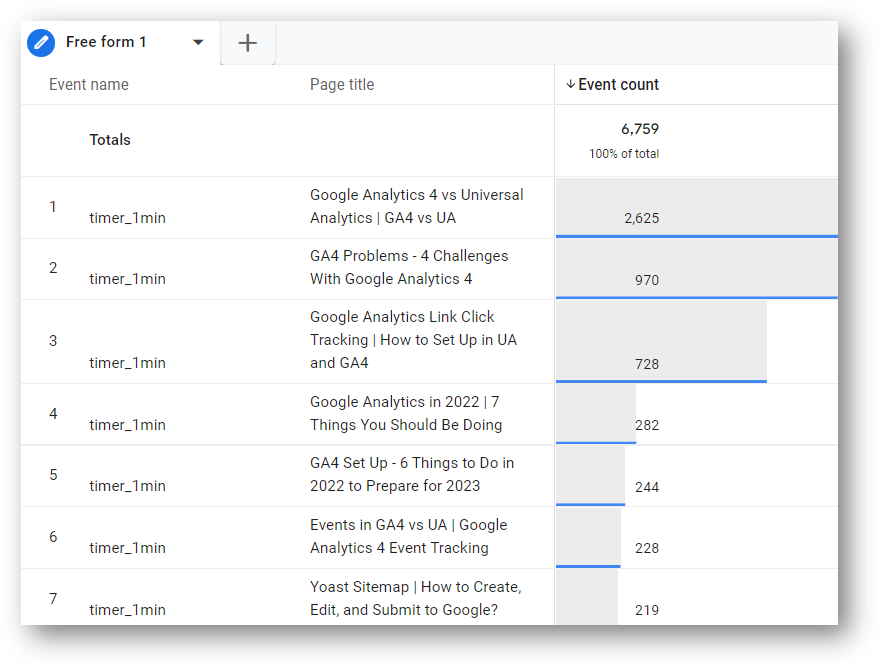
That’s it. Enjoy your new GA4 page timer tracking capabilities!
Wrapping Up
I hope this helps as you think about your future plans for web analytics. It’s a time of significant change in the industry and there are a lot of options to consider. What we know with certainty is that Universal Analytics is not a viable long-term option. Data will no longer be processed in that platform beginning July 1, 2023 so it’s time we get serious about GA4.
About Root & Branch
Root & Branch is a certified Google Partner agency and focuses on paid search (PPC), SEO, Local SEO, and Google Analytics. Hit the button below to check out YouTube for more digital marketing tips and training resources.







Hello,
Thanks for this great post. Exactly what I was looking for !.
My query is should we need to create a variable. If yes, why?
John, hello. Glad you found this helpful.
Unless I’m mistaken (always possible!) there’s no mention of creating a variable in this post. So no, no need to create a variable if you follow this process. Let me know if I’m not understanding your question. Thanks for coming by!
This method will restart your timer every time the user loads a new page. So this is really measuring 1+ minute of viewing a page, not total time spent on site.
Yes, that is correct. This page timer will fire an event on each page when the 1 minute timer has elapsed.
If you’re interested in the total session duration, that would be a different approach.
Hi, can you please learn how to track total session duration goal
intensely interested in what approach you would take to create a custom event to fire when total session time hits a certain threshhold?
I’m not aware of a simple way to do this. That’s because events / conversions in GA4 are “event-scoped.” A session time goal would be dealt with at the session level (“session scope”) and isn’t compatible with how GA4 works. I found this blog which you might want to check out.
It involves creating a custom HTML tag in Google Tag Manager: https://twooctobers.com/blog/track-session-duration-conversions-in-ga4/