
How to Set Up Google Shopping: Google Merchant Center, Product Feeds and Campaigns
So, you want to know how to set up Google Shopping? You’ve come to the right place. We were asking the same question a few months ago and found there weren’t a ton of great guides that dealt with the entire process from beginning to end. This is a step by step review of the major milestones that will get you to launching a Google Shopping Campaign. Other articles will do a more detailed job of explaining how to optimize and refine different parts of the process, while this one is designed to provide a higher-level view.
Google Shopping Orientation
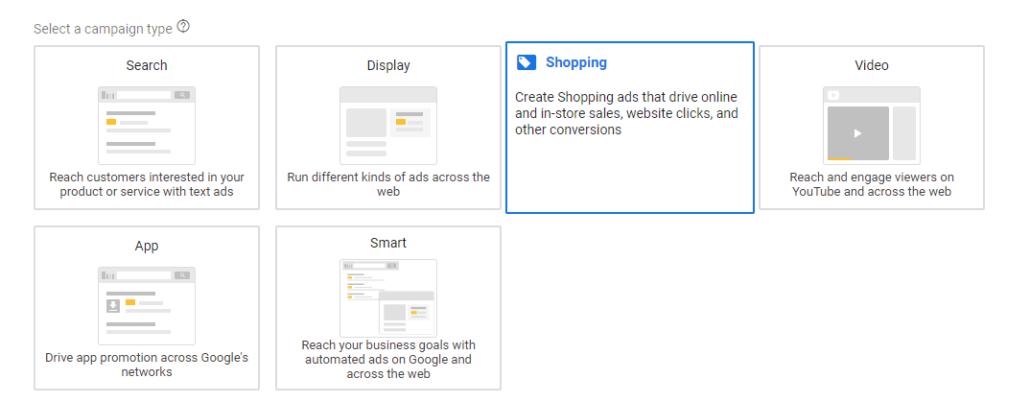
We know where we want to get. We want to log in to our Google Ads account and be able to select the “Shopping” campaign type as shown below. Then, we want Shopping Ads to show up on the Google SERP (search engine results page).
As a refresher, here’s a quick overview the main results on a Google SERP.
The blue arrow shows the #1 Paid Search result. Great news! That happens to be our client. And if you’re interested in reading more about PPC Services, feel free to go take a detour before coming back for more on setting up the very different Google Shopping campaign.
The red arrow shows the #1 Organic Search result. This is free and earned based on the strength of the domain and the optimization of the page in question. Thoughtful SEO services and digital analytics are our primary focuses at Root and Branch.
The green arrow shows the Google business listing. Google My Business (GMB) is a massively underutilized asset for many regional businesses. Here are our top Google My Business tips and more information on Local SEO services.
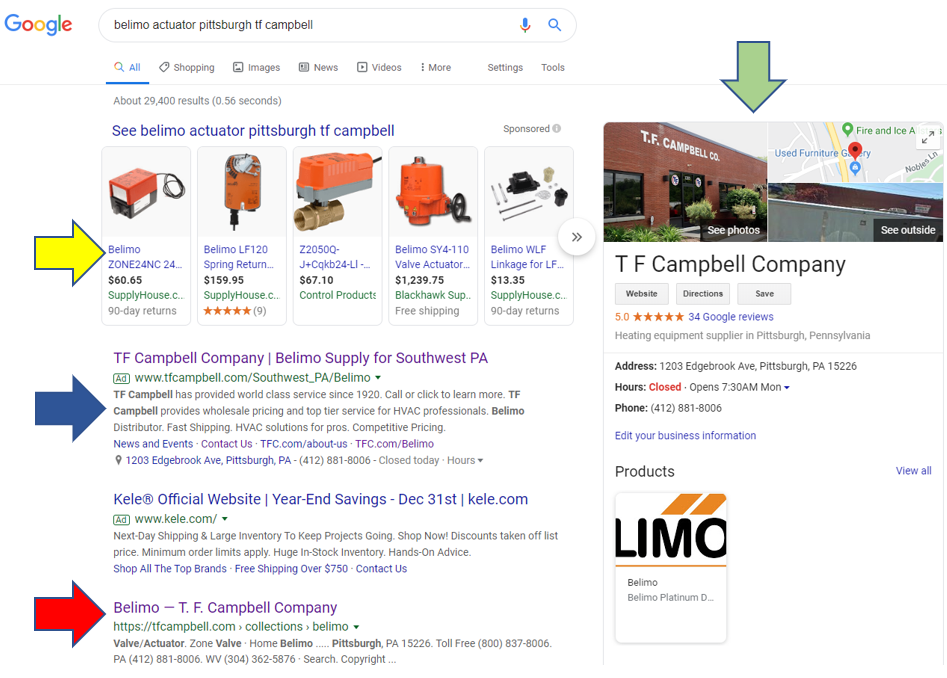
But we digress. We want to get product shopping ads to show up in the scrolling feed at the top of the page where the yellow arrow is. This is the one page on the SERP where our client is not, and we want to get them there. Onward!
Part 1: Set Up Merchant Center Account
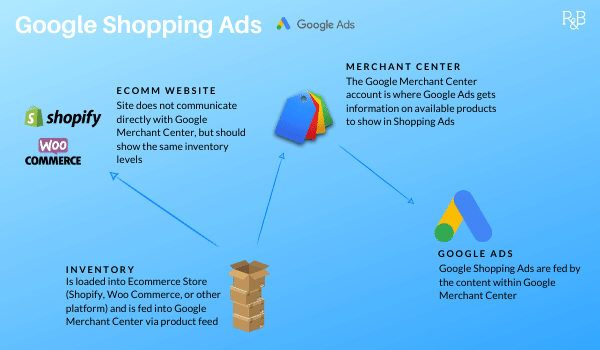
Unlike Google search ads or Display ads, the actual ad content for a Shopping Campaign doesn’t live in the Google Ads platform. Instead, it resides in a place called the Google Merchant Center.
The diagram below shows how Google Merchant Center fits in the Google Shopping ecosystem. It’s essentially the central point between the Ecommerce merchant (specifically, the products that the merchant has to sell), and Google Shopping Ads. Merchant Center communicates with both the merchant and will Google Ads to maintain a clear picture of the specific inventory that is available to sell.
The first thing to do is to set up a Google Merchant Center account. We highly recommend you check out the short onboarding article here.
To set up a Merchant Center account, you’ll need a Google account, such as Gmail or any other Google-linked email. If you don’t have one of those, the first place to head is accounts.google.com to sign up for one.
After that, head on over to merchants.google.com to sign up for a Merchant Center Account.
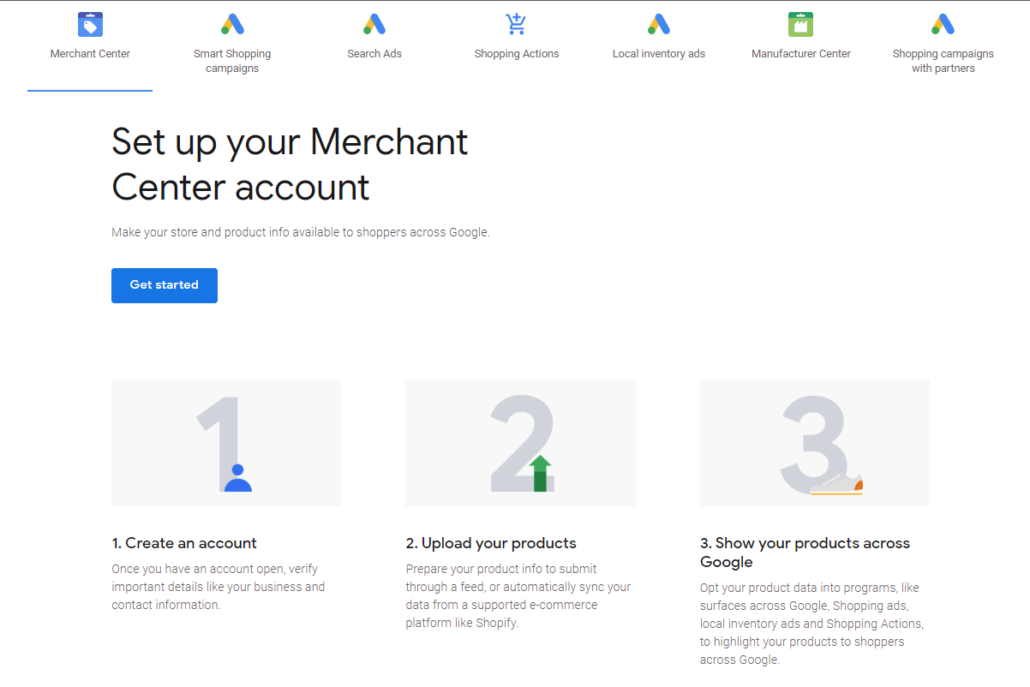
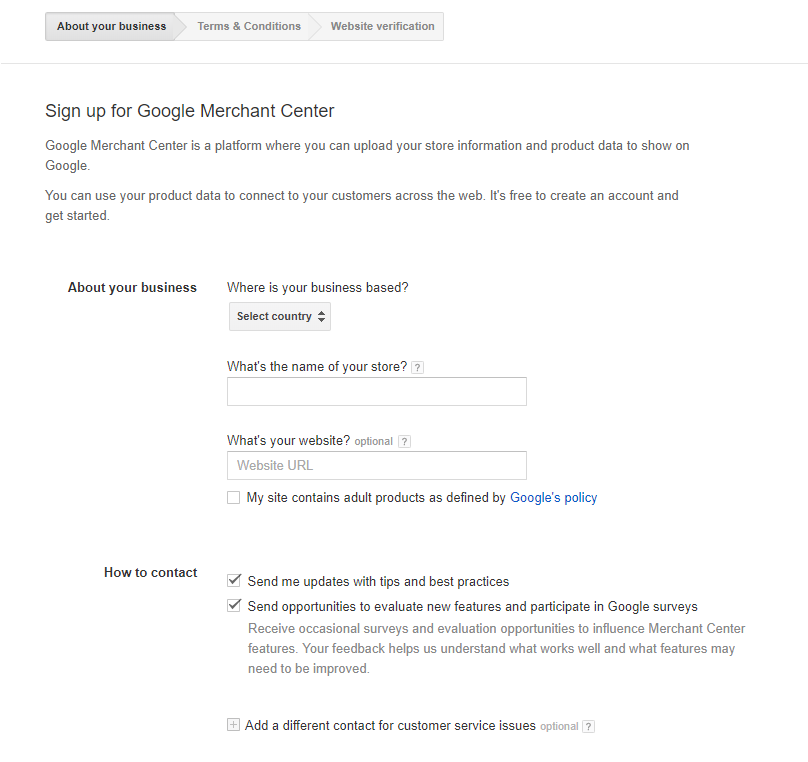
Here are the 3 things you’ll need to bring with you to fill out the initial “About your business” section:
- The country where your business is registered (the “Business country”)
- Your “business display name”, which will function both as the name of the Merchant Center account and will also be what customers see across Google when they see your products
- Your website URL
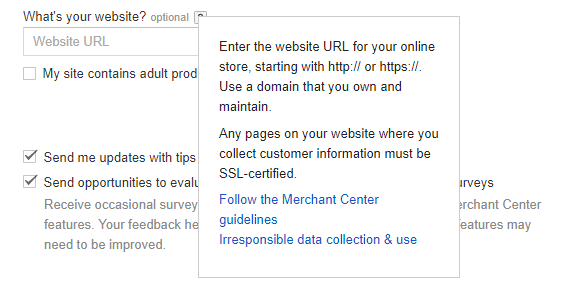
For the website URL, keep in mind that any pages that collect customer information must be SSL-certified (HTTPS protocol). Friendly reminder from Google shown in the screenshot below.
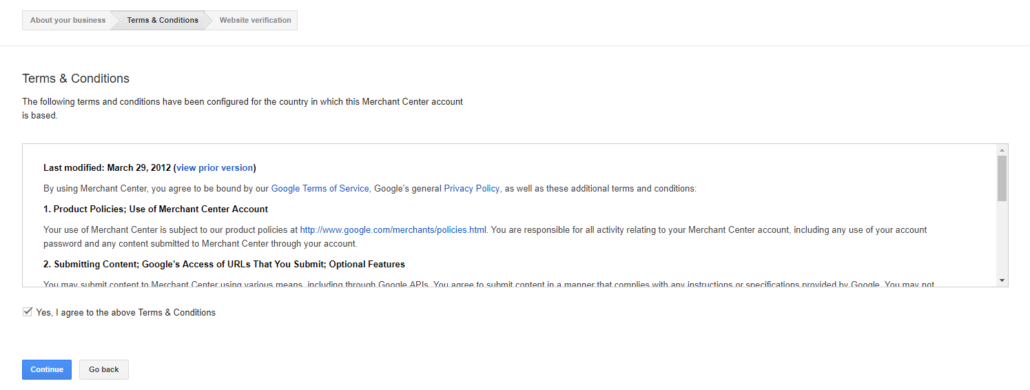
You’ll then need to review and sign the “Terms & Conditions”. Google will remind you that you’re bound to their standard terms of service and also their privacy policy. There are 4 additional terms specific to Merchant Center dealing with Product Policies, Submitting Content and Optional Features, Third-Party Content, and Your Trademarks that require review and sign-off before proceeding.
Part 2: Claim and Verify Website URL for Merchant Center
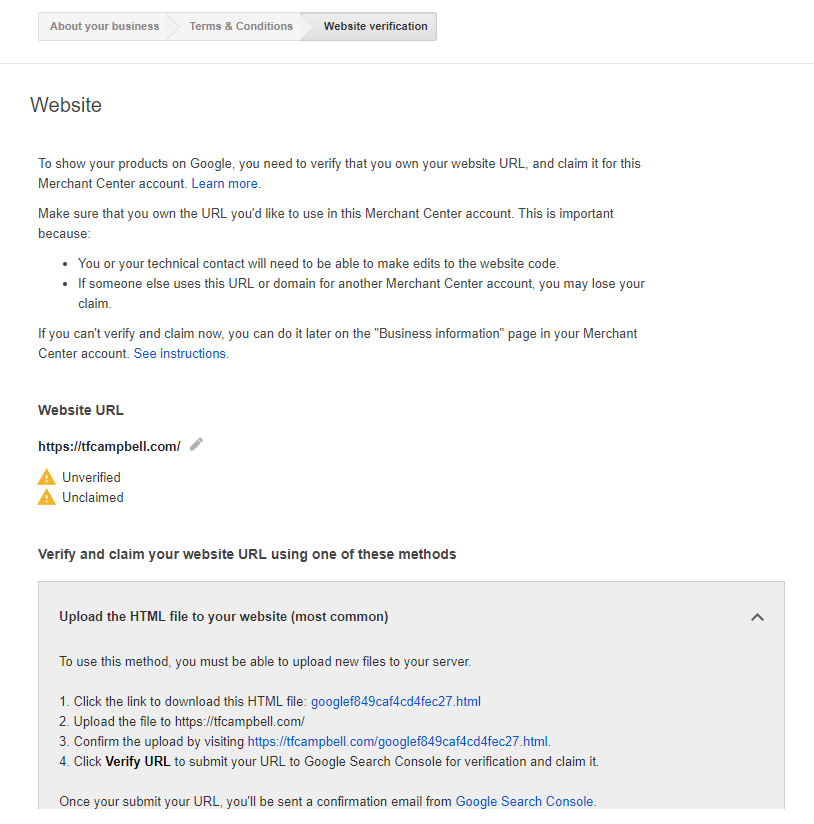
After that it’s on to the Website verification step. Merchant Center accounts need to be linked to a corresponding web site, and this step is where that integration takes place.
You can see this step in the image below where we’ve entered the “Website URL” of our client.
In addition to uploading an HTML file to the website, there are some additional (and often simpler) methods to consider.
As you can see in the bottom three options in the screenshot below, you can verify and claim the website URL for the Merchant Center account by doing one of the following:
- You can add a piece of HTML code to the website.
- You can use your existing Google Analytics account (you must have admin privileges).
- You can use your existing Google Tag Manager account (you must have admin privileges).
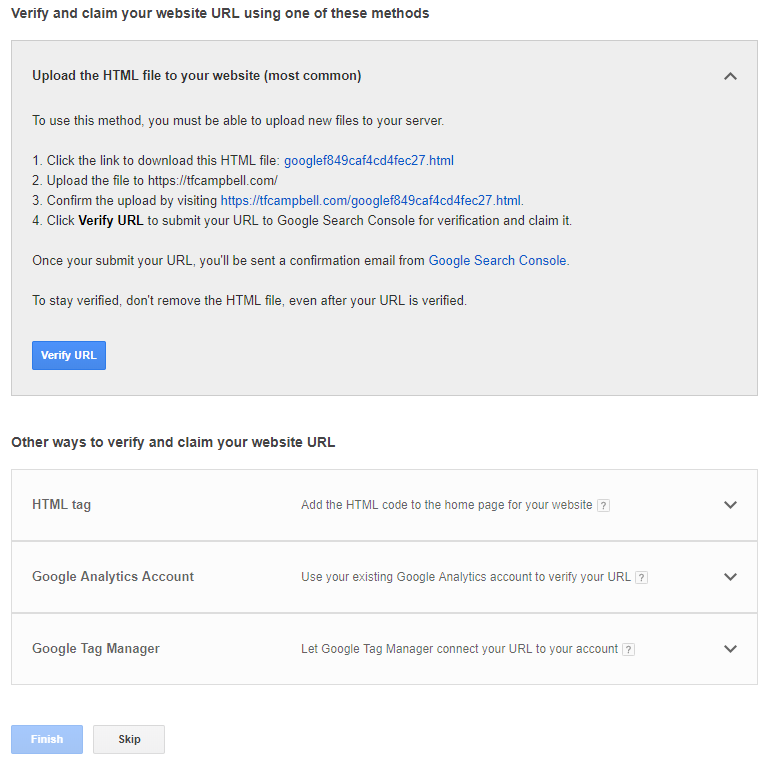
In this case, we’re going to use the meta tag. You can see the meta tag in the white box in the screenshot below. Grab that tag and get ready to place it on the website’s homepage in the <head> section.

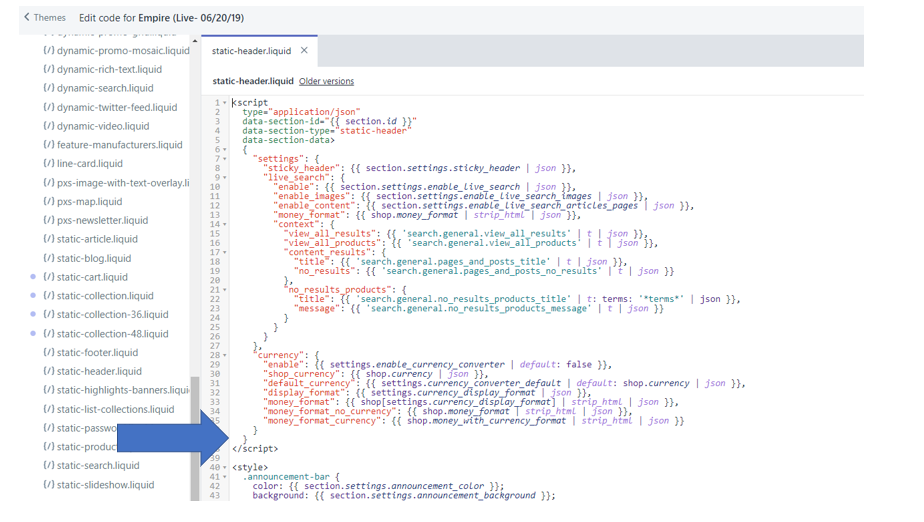
This particular website is built on Shopify. You’ll need access to the site to adjust the code. Once logged in, select “Themes” from the “Sales Channels” navigation on the left side of the page. Now, select the “Customize” button.
At the top of the page, you will see a drop down where you can select the page to edit. Select the Home page. On the left hand side navigation, select the “Header” section as you can see in the red box displayed above.
Scroll down and select “Theme actions” and then select “Edit code.”
Now you’re in the source code and you can place the piece of HTML code from Google Merchant Center. Drop it right around where the blue arrow is below.
Boom! You should be verified. And if you have admin rights on the Google Analytics account or the Google Tag Manager container code through the same email address you’re using to set up Merchant Center, you can even skip these prior steps and verify that manual piece of code implementation.
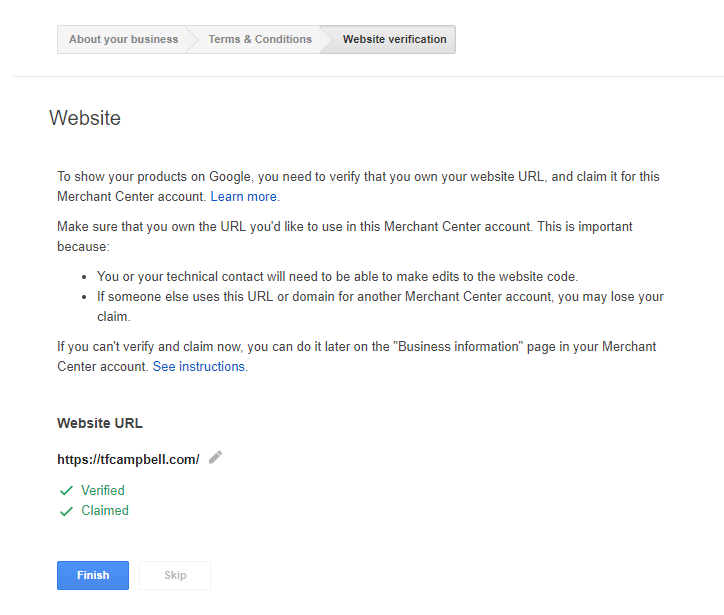
This is what happens after the website is verified and claimed. It feels nice to see those little green check marks.
Part 3: Ensure Compliance With Google Shopping Policies
By this point, you have a Merchant Center account and you have associated your Merchant Center account with your website that sells things online. Things are on the right track! At this point, it’s probably a good idea to mention that you can effectively “save your work” and come back at another time to finish. The entire process is a long one, so it’s good to be reminded that all information that is entered in Merchant Center will be saved for you to take the following steps in a careful and systematic fashion.
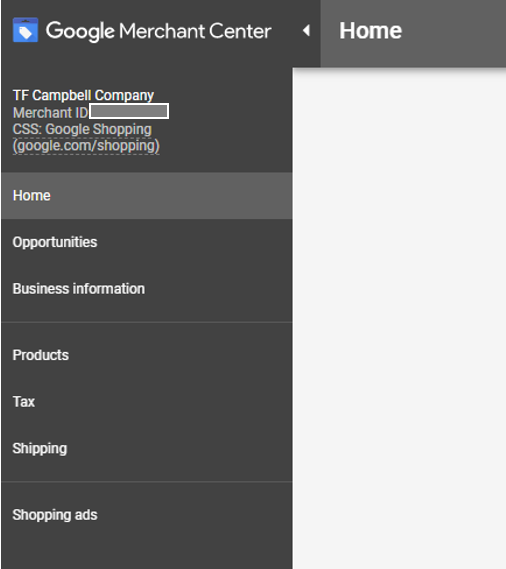
When you do log in to Merchant Center, you can see that you have your very own Merchant ID. That’s hidden in the screenshot below, but you’ll see it in the top left of the screen below your “Business display name.”
Now that we’re in Merchant Center and synced up with our verified web site, we’re going to make sure we’re checking the boxes of compliance with Google Shopping policies.
The majority of these policies deal with items that must be present on your website. Let’s tackle them in steps as shown in the screenshot below.
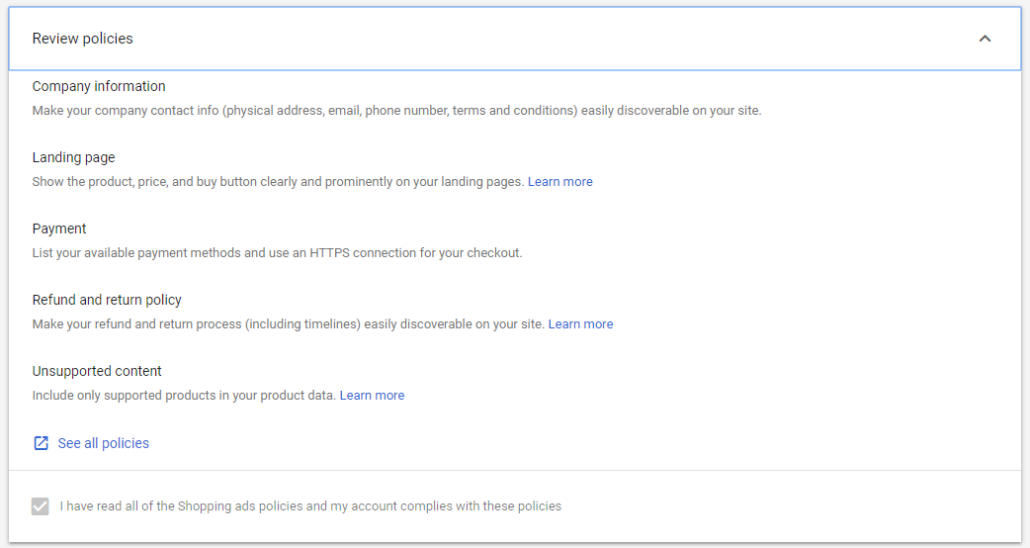
- Company information: company address, contact info (phone and email), and terms and conditions must be discoverable (crawlable by Googlebot) on your site.
- Payment info: Google requests that eligible payment methods are listed on the site. They also request that images are included of the specific credit cards that are accepted, but in our experience you will still be ok if you only list the payment methods.
- Refund and return policy: If you’re going to sell things through Google Shopping, you need to have content on your verified website that explains your refund and return policy. Here’s an example: https://tfcampbell.com/pages/term-and-conditions
- The other two items are a little simpler. If you’re running an Ecommerce website (which you are, if you’re setting up Merchant Center) you should have product and price displayed on your site, thus covering off on the “Landing page” requirement. And as long as you only sell legitimate merchandise, you will be fine on the “Unsupported content” requirement.
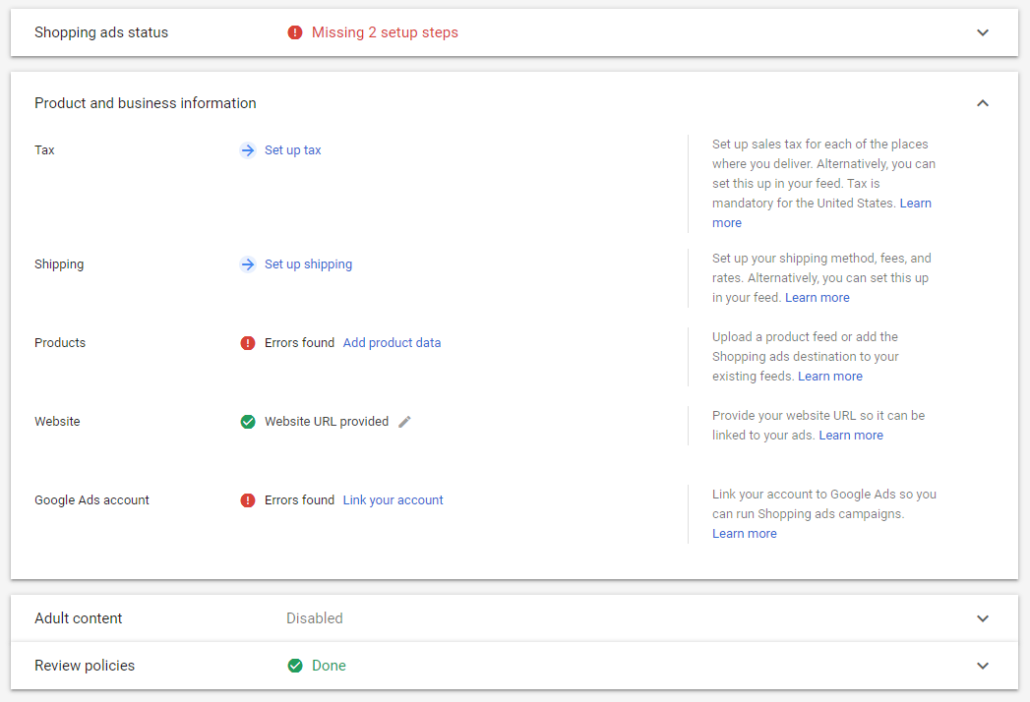
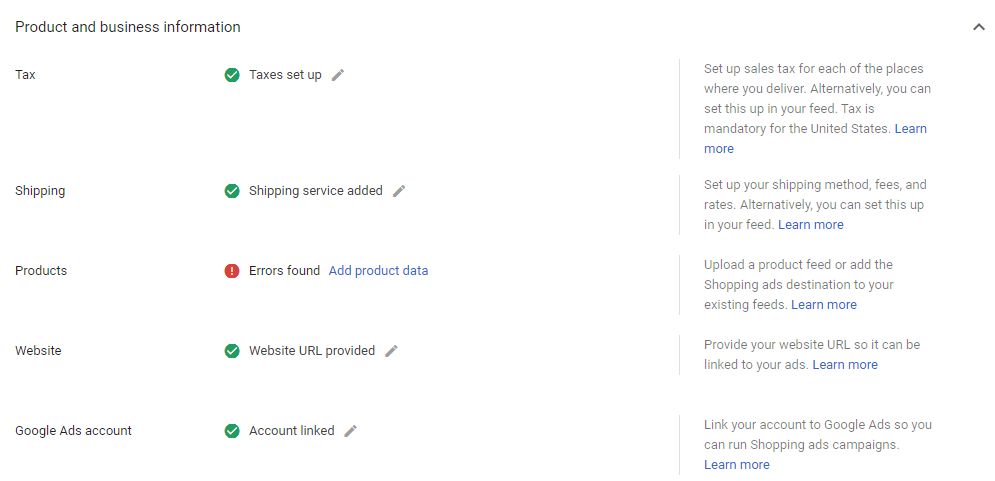
Once you have completed this step, your overall status in terms of the setup process will look like the screenshot below. You should see those happy green check marks next to Website verification and also next to Review policies. There are 3 steps to go, including setting up tax and shipping (we’ll combine those into one step for our purposes), setting up Products to advertise, and syncing Merchant Center with a Google Ads account.
Part 4: Link Merchant Center With Google Ads Account
Google Merchant Center is the midway point between available products to sell (a merchant’s inventory) and the place where customers can see ads to buy them (Google Ads). To make that possible, we need to now link Merchant Center with Google Ads.
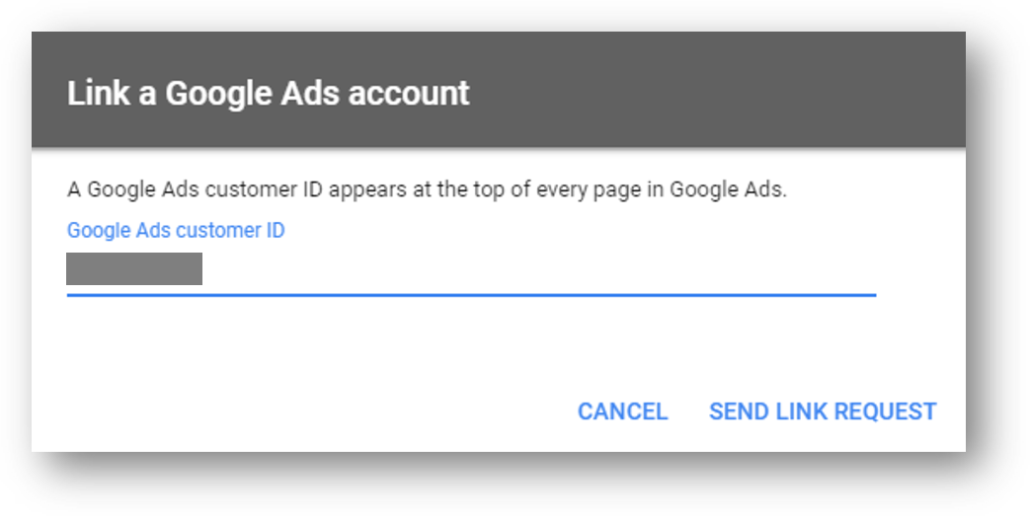
First, track down your 10-digit Google Ads account idea. Then, from Merchant Center, click the link to “Link your account” as shown in the screenshot above to the right of “Google Ads account”. You’ll see a place to add your Google Ads customer ID and can then click “Send Link Request” to communicate with Google Ads.
Your status in Merchant Center will now say that “Account link needs to be confirmed in Google Ads.”
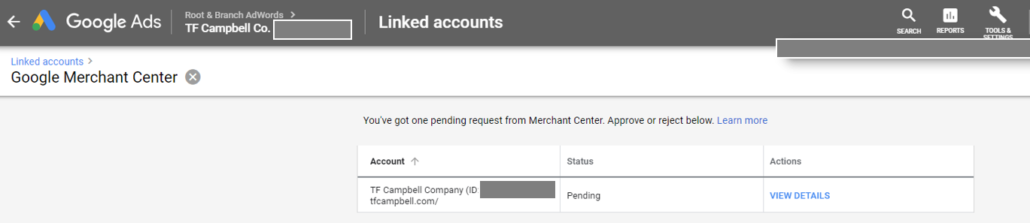
Now, open a new window and head on over to Google Ads (ads.google.com). Once logged in to Google Ads, select Tools and Settings (the wrench icon in the top right of the screen) and then select “Linked Accounts” under the “Setup” menu section. Click on “Google Merchant Center” and you’ll see the pending request that you just triggered from Merchant Center.
Click “View Details” as shown below and you can then click “Approve” to make the connection complete.
Now head on back over to Merchant Center and refresh your page. You should see the following Google Ads account link status now.
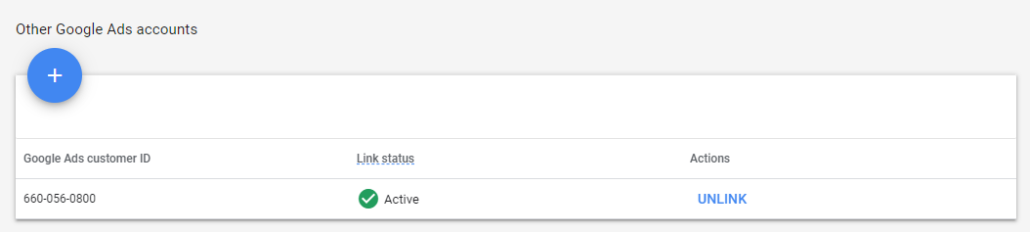
And now we’re done with that! Another check mark.
Now we’re on to Tax (part 5)and Shipping (part 6).
Part 5: Set Up Tax in Google Merchant Center
Google Merchant Center is the midway point between available products to sell (a merchant’s inventory) and the place where customers can see ads to buy them (Google Ads). To make that possible, we need to now link Merchant Center with Google Ads.
Google’s help articles on setting up the Tax situation breaks down the three options you’ll have when setting up taxes for the first time. Those options include the following:
- Don’t configure tax at the account level. Select this if you charge taxes in the United States, but set up tax only through the tax attribute.
- Configure no nexus for all states. Select this if you don’t charge taxes in the United States.
- Configure tax and set up nexus. Select this if you do charge taxes in the United States.
The first of these should likely not be used. Using the tax attribute allows you to override the account level tax settings for your Merchant Center account. This could, for example, allow you to charge flat rate taxes based on specific product types. You can read more about it here from Google, but we’re going to deal more with options 2 and 3 here.
For the second and third option you may have the same initial question that we did when going through this process for the first time: What the heck is a nexus?
“The term nexus is used in tax law to describe a situation in which a business has a “nexus” or tax presence in a particular state or states. If a taxpayer has nexus in a particular state, the taxpayer must pay and collect/pay sales taxes in that state and pay income tax on income generated in that state.”
This can be complicated and should require a consultation with your accountant or lawyer (or tax lawyer), but in general you businesses may not be accountable for paying taxes to a state if they do $500,000 or more in annual online business with customers in that state. But the above is not intended to be advice, legal or otherwise, and you should certainly consult with a tax professional. For your own edification, here are some articles for further reading on the topic:
- Google’s help article on setting up tax settings: https://support.google.com/merchants/answer/160162
- More on economic nexus laws: https://blog.taxjar.com/economic-nexus-laws/
Part 6: Set Up Shipping in Google Merchant Center
Similar to Tax set up, you shouldn’t expect to blindly click through some settings and have your Ecommerce Shipping situation set up without doing homework in advance. The information below should provide a preview of what you’ll need so you can get your proverbial shipping ducks in a row before finalizing everything in Merchant Center.
To set up shipping in Merchant Center, you’ll create and configure something called a “shipping service”. A shipping service refers to the specific rules and logistics for how shipping operates, and can apply to all of your products or a subset of products. What does that mean? Here’s a hypothetical example.
Let’s imagine an Ecommerce store that sells only shoes and refrigerators. The shoes are high margin and relatively inexpensive to ship. Therefore, the merchant sets up a shipping service specific to their shoes, where all shipping in the United States is free.
The refrigerators, on the other hand, are relatively low margin and incredibly expensive to ship. Don’t ask why they decided to base half of their product assortment on something so unwieldy to ship (it’s still a sore subject!), but they know that if they offered free shipping on their heavy refrigerators they would lose money on each sale and wouldn’t be able to stay in business. Instead, they configure a shipping service specific to refrigerators where they charge a flat rate of $150 for shipping on all refrigerators in the United States. This shipping service is applied only to the refrigerators in their store, so they don’t accidentally charge customers $150 shipping charges on a pair of $100 shoes!
Here is the Google help article with information specific to shipping services.
To get started, select the tools icon (the wrench) and select “Shipping and returns”. You’ll now be on the “shipping services” tab. Click the blue and white plus button to create a new shipping service.
You’ll now need to do 5 specific things when you create your new shipping service. We’ll preview them here.
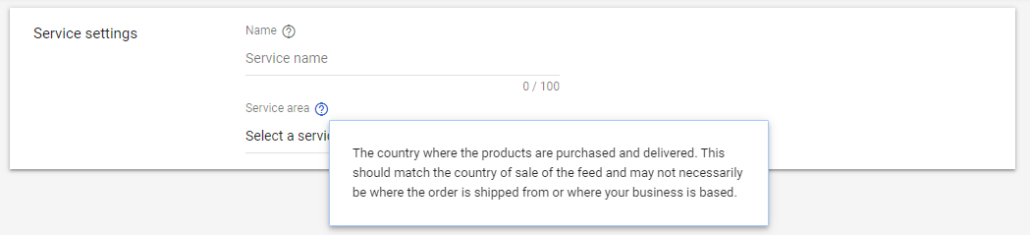
Step 1 – Service settings: Name your service (“free shoe” or “flat rate refrigerator” shipping in our example) and select your service area (the country where products are purchased and delivered). You’ll also need to select your currency.

The service area is the country where customers are located.
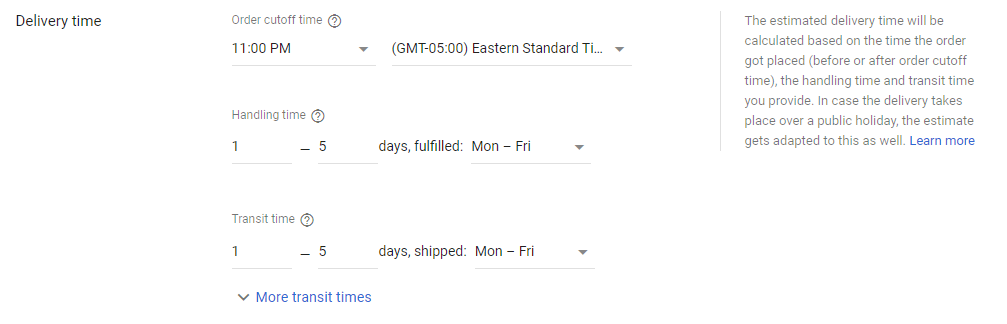
Step 2 – Delivery time: You’ll need to know the following terms: order cutoff time, handling time in business days, transit time, and delivery zones.
- Order cutoff time: Let’s say those free shipped shoes always ship in 2 days. The order cutoff time is the time of day that the order must be placed in order for those 2 days to apply from that day forward. If the order cutoff time is 4:00 PM, for example, an order placed at 4:01 PM on a Monday would not be processed until the following day (Tuesday!) and the 2-day shipping would have the shoes arriving on Thursday.
- Handling time in business days: You’ll need to enter a minimum and maximum time for this field. Some large and / or complicated products take time to get ready before shipping. For anything that is shipped and processed the same day that it is ordered (say, our shoes), the minimum would be 0 days. Let’s say our refrigerators, on the other hand, don’t get shipped the same day they are ordered. They take anywhere from 1 – 3 days depending on the specific unit that is ordered and the workload of the warehouse on the day in question. In that case, we’d enter a minimum of 1 and a maximum of 3 when we set up handling time for our “flat rate refrigerator” shipping service. You can also choose what days of the week processing takes place. For example, if no one is working in the warehouse on Sunday, you would select Mon – Sat as the days of the week when processing takes place.
- Transit time: The goal here is to set up the approximate range of total days it will take for the product to be shipped to the customer. This will vary (perhaps based on the user’s location), you can put in a range of time to give potential customers an idea of how long it will take them to get their product after they purchase from you. This information will be displayed in Google Shopping (shopping.google.com) as customers browse products. In that way it helps them to make a purchase decision. It is not something that somehow connects with your Ecommerce product page and therefore does not show up during the online checkout experience.
- Delivery zones: This is an optional field. If our Ecommerce seller is based on the East Coast, it’s highly likely that it takes longer to ship something to California than Connecticut. Delivery zones allow transit times to be configured based on specific geographies to provide a more accurate estimate of shipping timelines.
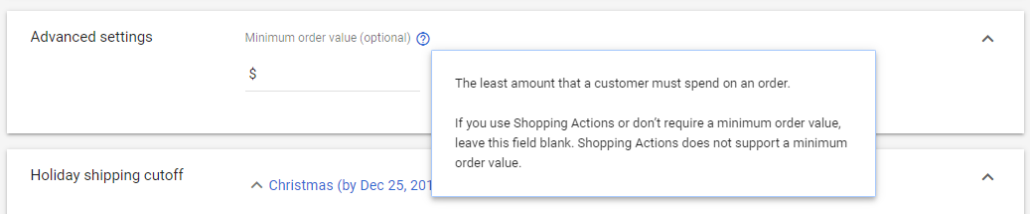
Step 3 – Advanced settings (Optional): The most likely reason you’d need to use this optional field is if you have minimum order values for a specific shipping service. In the case of our “free shoe” shipping service, it may only be financially viable to offer this on shoes that are $75 and up. In that case, you’d add that value as the minimum order value when setting up that particular shipping service. If there are no shipping minimums for the shipping service then you leave the field blank.
Step 4 – Holiday shipping cut-off for US Holidays: If your store gets especially busy at the holidays, you can temporarily override the estimated transit times you’ve set up in Step 2. In this case, enter a specific date that all orders need to be placed in order to be delivered by a specific date. Thanks Santa!
Step 5 – Shipping rate: This is where you set up the shipping costs for the specific service. You will need to make decisions about how much variability and complexity you want to apply. Hit the blue plus button to begin the process of adding a new shipping rate. The specific language you’ll see is to add a new “shipping rate table.” We’ll see that table appear in a screenshot lower in the article.
As you can see in the “Affected products filter” in the screenshot immediately below, you’ll need to determine whether these shipping costs apply to “All products” or a subset of your products.
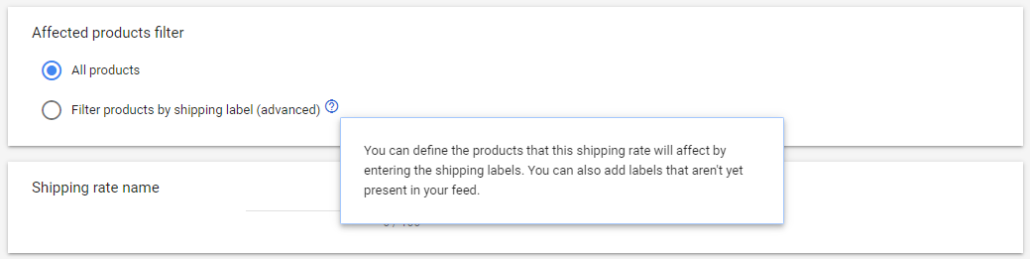
For our purposes, we’ll assume that we’ve already set up our shoes in our product feed (we’ll covering setting up that product feed in the next step), so we’ll select All products since all shoes have the same shipping rates (free!).
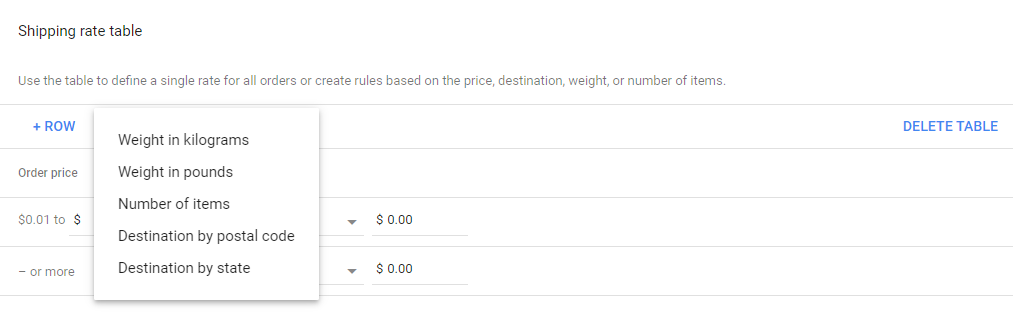
Now we will need to name our “Shipping rate table” (something like “Free Shipping” would work perfectly well here), and then set up the table. The shipping table allows us to define a single rate for all orders, or alternatively we can create rules that will calculate the shipping rate. Any shipping rules rules can be affected by one or two of the following fields: price, destination, weight, and number of items. You can see those dimensions in the drop down menu in the screenshot below.
This can clearly get complicated, so we’re going to recommend that you delegate this task to supply chain and logistics personnel if you’re not going to make things simple and straightforward.
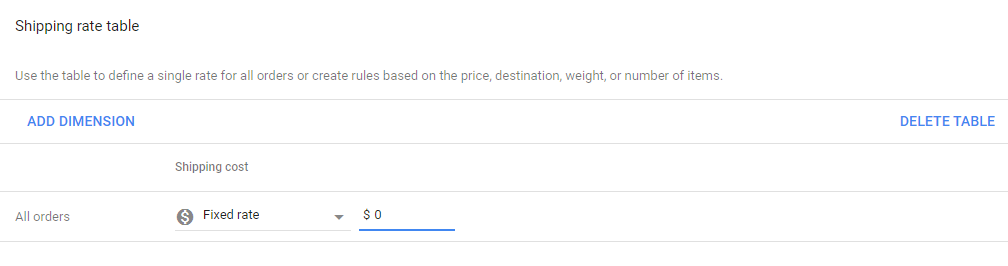
For us, we like simple and straightforward with our shoes, so we’re going to set up our free shipping. To do that, we simply designate that “All orders” have a “Fixed rate” “Shipping Cost” of $0. See the screenshot below.
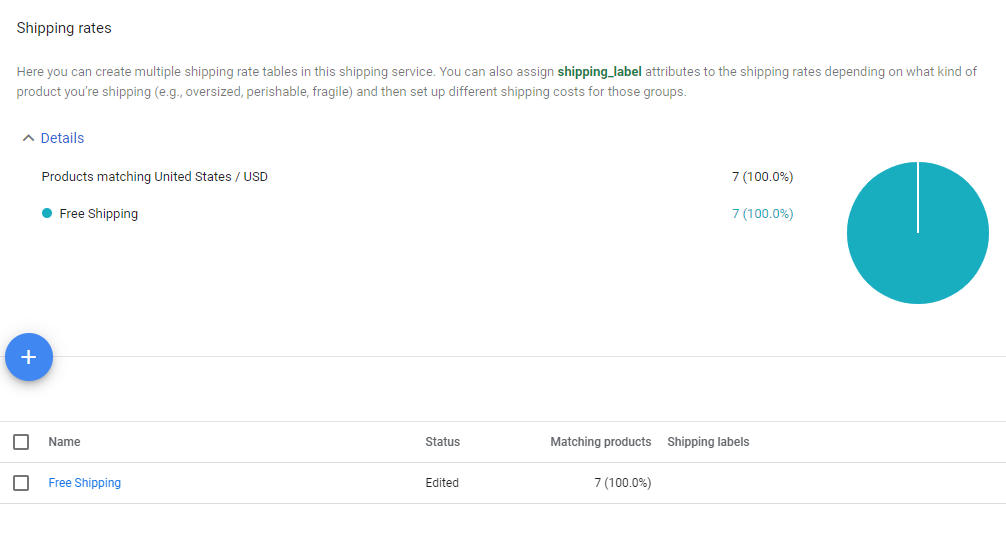
As you create shipping rates, Merchant Center will help you keep tabs on how much of your merchandise assortment falls under different rates that you’ve established. Here’s an example below, where we have only set up Free Shipping for 7 products.
That’s enough shipping for now. You can always add more shipping services and shipping costs in the future. Our overall Merchant Center set up process is almost complete. We now need to set up our product feed, which will sync our inventory position with Google Merchant Center.
Part 7: Set Up Product Feed in Google Merchant Center
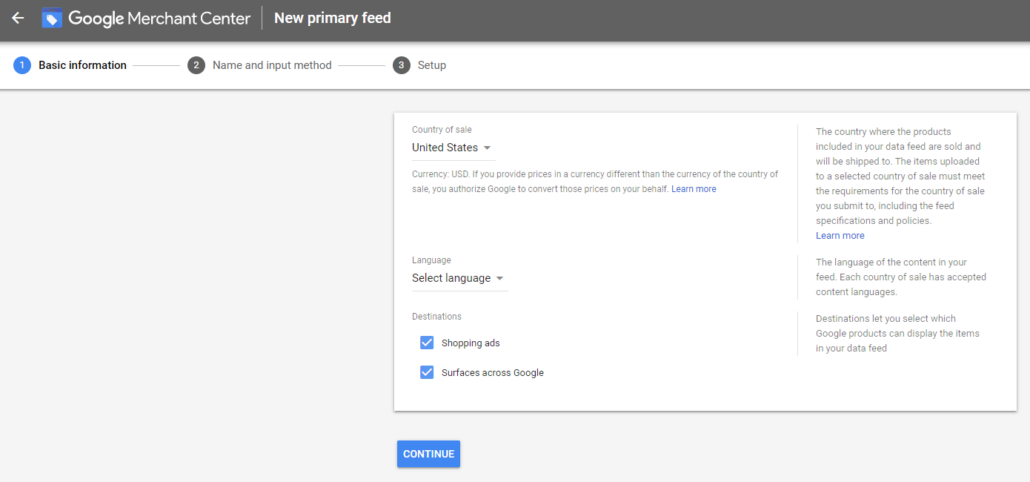
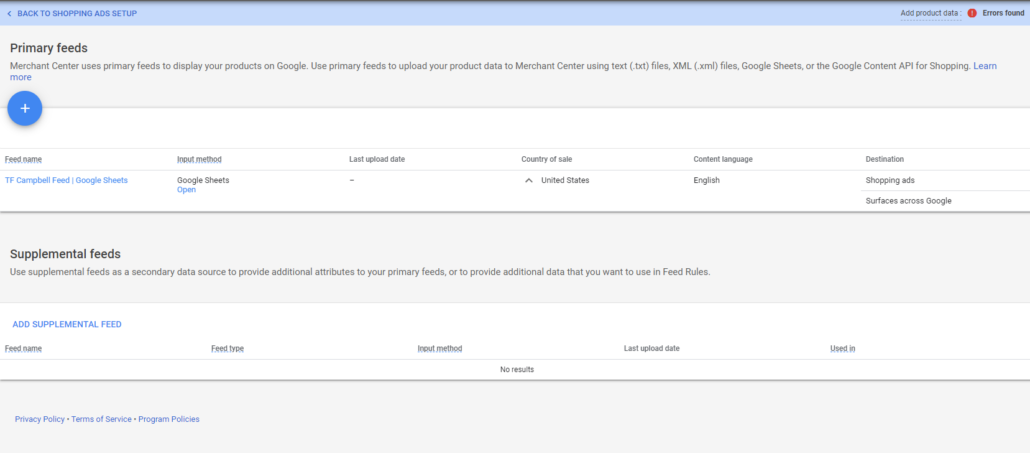
To make this happen we want to add a “New primary feed”, the tool that sends product and inventory information to Merchant Center.
In Step 1, we want to select our country of sale and determine if our Destination will be “Shopping ads” and / or “Surfaces across Google.” You can make life a little easier by going with the default recommendation to do both. Or you can read the linked help article If you really want to read more about Surfaces across Google.
On to step 2! You will need to make two decisions here. The first decision is the name of your feed. The second decision is the spefic mechanism whereby the product data gets connected to Merchant Center. There are 4 options to setting up the feed.
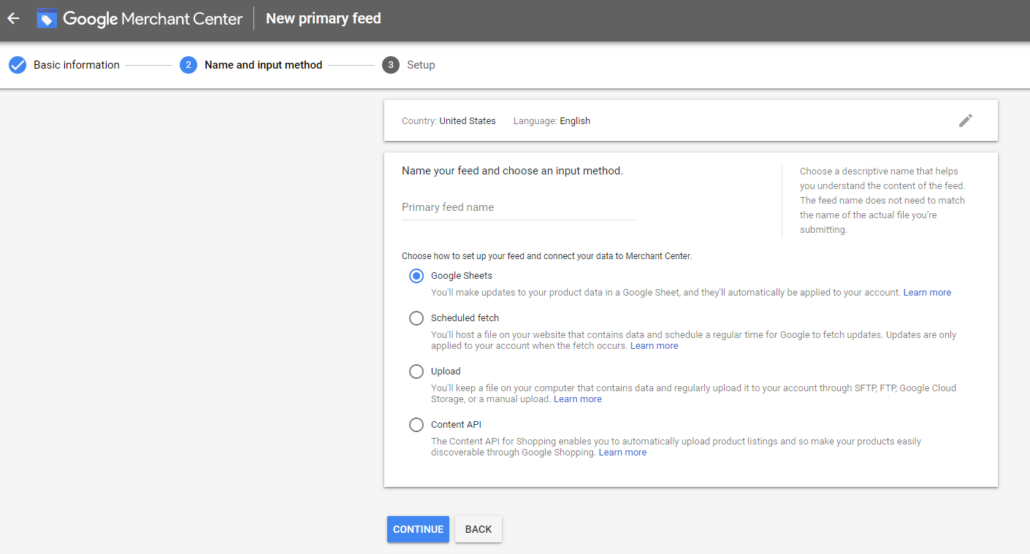
As you can see with the radio button we’ve selected above, we’re going with “Google Sheets” for our purposes. This is the most straightforward option and will be our area of focus, for the purposes of this example.
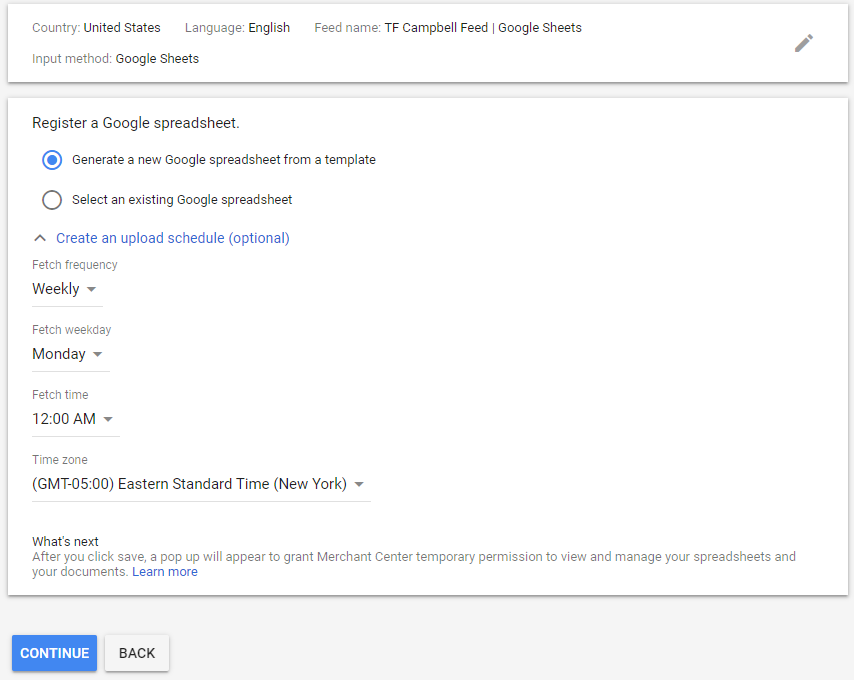
On to step 3! With our manual option of “Google Sheets” we need to determine if we’re going to “Generate a new Google spreadsheet from a template” or “Select an existing Google spreadsheet”. If you don’t already have an existing Google Sheet formatted specifically to serve as a product feed, this is an easy decision. That is the case for us. Let’s generate a new Google spreadsheet!

You can also see in the screenshot above that there is an optional option to “Create an upload schedule”. This is a good idea, both because it automates part of the process and because it provides some structure to the inventory management process. The setup options shown below reflect a weekly update where Google Sheets sends updated inventory information to Merchant Center every week as soon as the clock changes from Sunday to Monday. As long as the inventory in the Google Sheet is updated each week by Sunday evening, Merchant Center will have refreshed and accurate data each Monday for the week ahead. Again, the “Content API” input method will make this automatic and real-time, so keep that in mind for future enhancements.
We now have established the name and upload parameters related to our Primary feed.
So what does that template for the Google Sheet product feed look like? Check it out below!
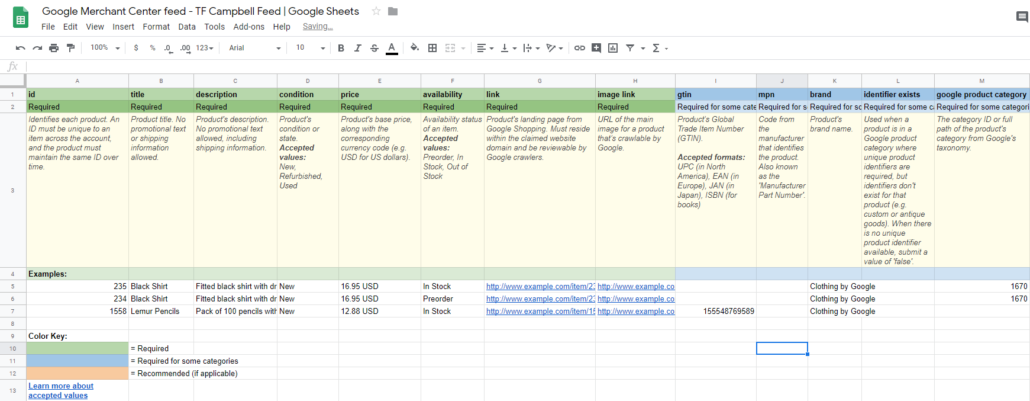
Google makes life a little easier for us by using a nice color coded system to explain the specific fields (column headings). Green means the field is required. Blue means the field is required for some specific categories of merchandise. Orange means that the field is recommended. You can also see the Google pre-populates the sheet with explanations of each field (row 3) and also provides 3 examples in rows 5, 6, and 7. Not bad, Google!
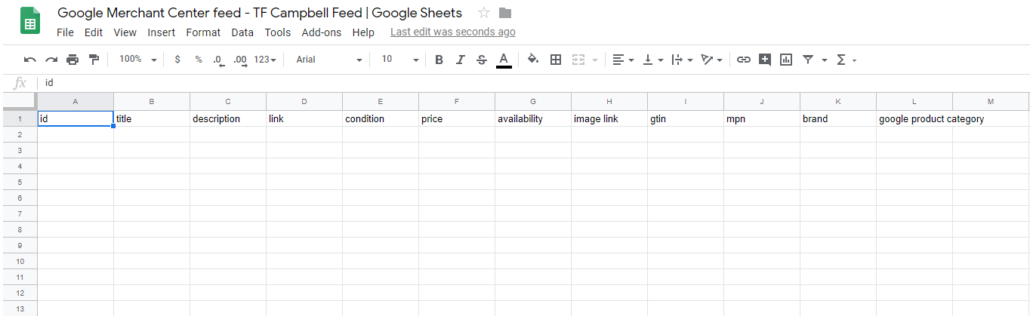
For our purposes, we’ll enter our product info into a blank version of the same sheet. Here’s an example of our product feed.
Once the products are entered into the feed, they are uploaded into Merchant Center. As you can see below, there is processing time involved for Google as the products are succesfully uploaded from the Google Sheets feed to Merchant Center.

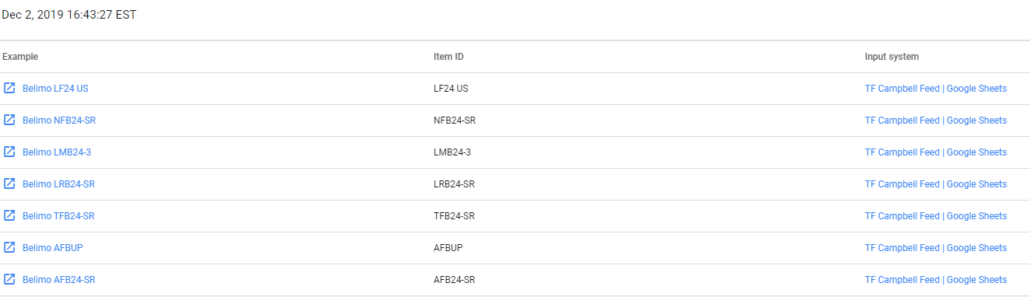
Once the feed has finished processing, the products will show up in Google Merchant and are now available to advertise on Google Shopping! You can see an example below.
Part 8: How to Set Up a Shopping Campaign in Google Ads
Well, it’s only taken 60 hours (or, you know, 6 months), but we’re ready to set up our Google Shopping campaign. It’s all downhill from here!
Create a new campaign in Google Ads and select “Shopping” as the campaign type. Since you’ve already synced Google Ads with Google Merchant Center as part of the set up process (Part 4, if you need a reminder), you’ll be able to select the associated Merchant Center account once you select “Shopping” as the campaign type.
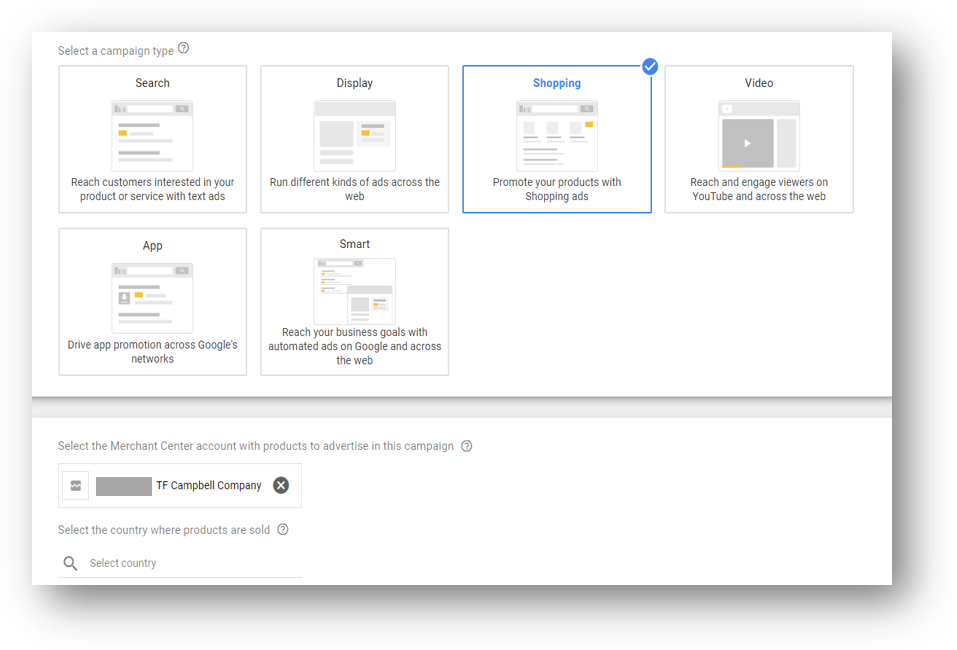
Determine if you want to create a Smart Shopping Campaign or a Standard Shopping Campaign and hit the blue Continue button.
Set up “Bidding and budget”, including your bid strategy and the “Campaign priority” for your Shopping campaign. Campaign priority is a worthwhile topic to read about more. We’re not going to cover it here, but this is a worthwhile article to read after you’ve wrapped up the initial set up. For now, we’re only setting up one campaign, so it’s easy enough to go with the default recommendation of “Low.”

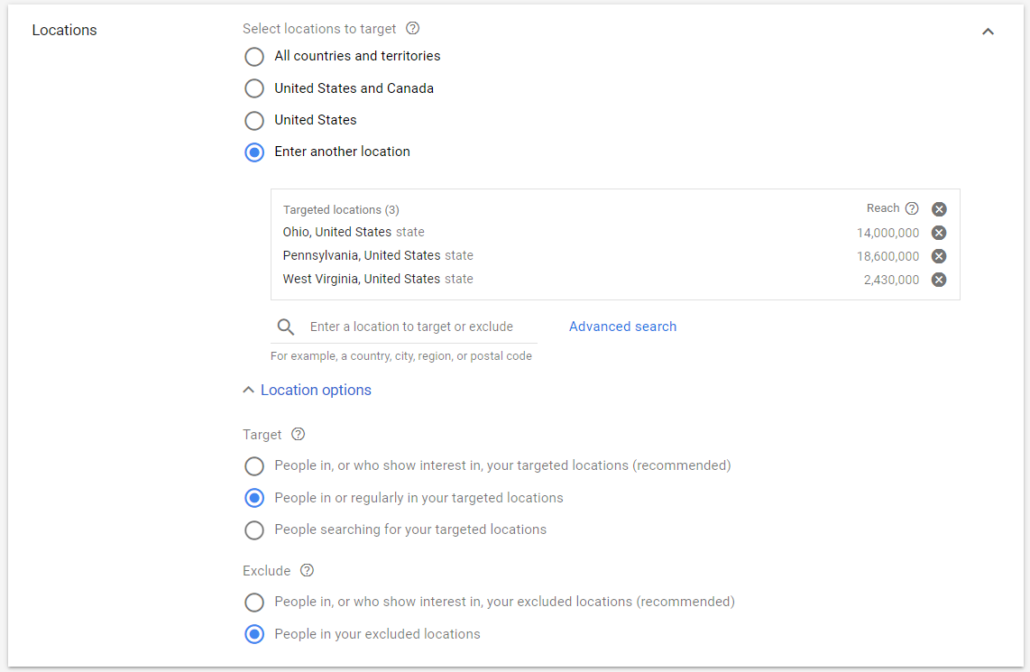
Now, select whether you want your Shopping Campaign to only be only available on Search (as we’ve selected below), or if you also want your ads to be discoverable on the Display network and YouTube. You’ll also pick your locations here. Quick tip: if you agonized over setting up shipping services by geography in Google Merchant Center, location targeting in Google Ads can be a simpler way to manage the same process. For example, you can choose run your ads in a single state or city where shipping logistics or easiest to manage.

In our case, we’ve elected to run ads in only the 3 states that are most important to our client’s business.
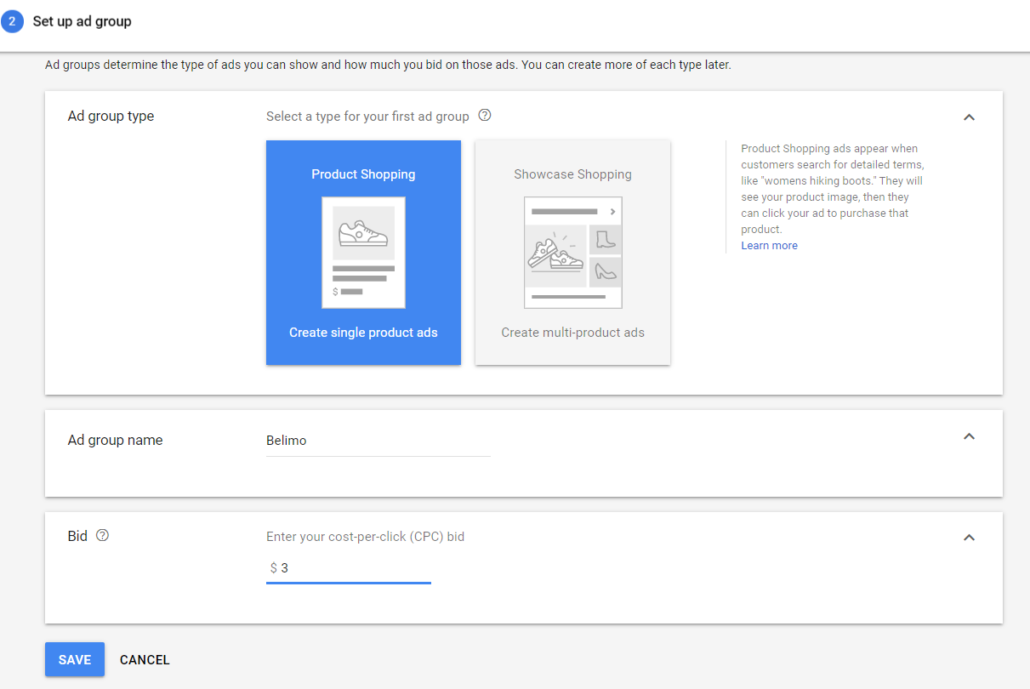
Finally, set up at least one ad group within the campaign. Choose the ad group type, give it a name, and put in a CPC bid.
You’re done for now. Campaign is launched. Now it will be time to manage your campaign, including smart bidding strategies, negative keyword management, and more. But take a break first. You’ve earned it.


Leave a Reply
Want to join the discussion?Feel free to contribute!