

The Ultimate Facebook Ads Guide: How to Navigate in Ads Manager and Create an Ad
Whether you’re new to Facebook or consider yourself a Facebook marketing pro, there are many new changes that have happened with this social media giant over time. And if you’re still used to boosting posts and haven’t had the chance to dive into Facebook Ads Manager, you most likely could use a helpful Facebook Ads guide. If you’re like us, you might not have had an interest in going through Ads Manager until you had a Facebook marketing expert call and learned it’s the only method Facebook recommends today.
Before Facebook Ads Manager became popular (and even now) many social media and marketing pros were simply “boosting” posts right from the post itself on a business page’s timeline. Although many businesses still do that, Facebook is really pushing for business owners, social media managers, etc. to use Facebook Ads Manager instead. Afterall, it is the central hub for Facebook ads now, and there is a lot to learn when advertising on Facebook. This Facebook Ads guide will help you understand how to navigate in Ads manager and how to create an ad in the platform.
Facebook Ads Guide: How to Navigate in Ads Manager
Step 1: Start out in Facebook Ads Manager, not your personal Facebook account.
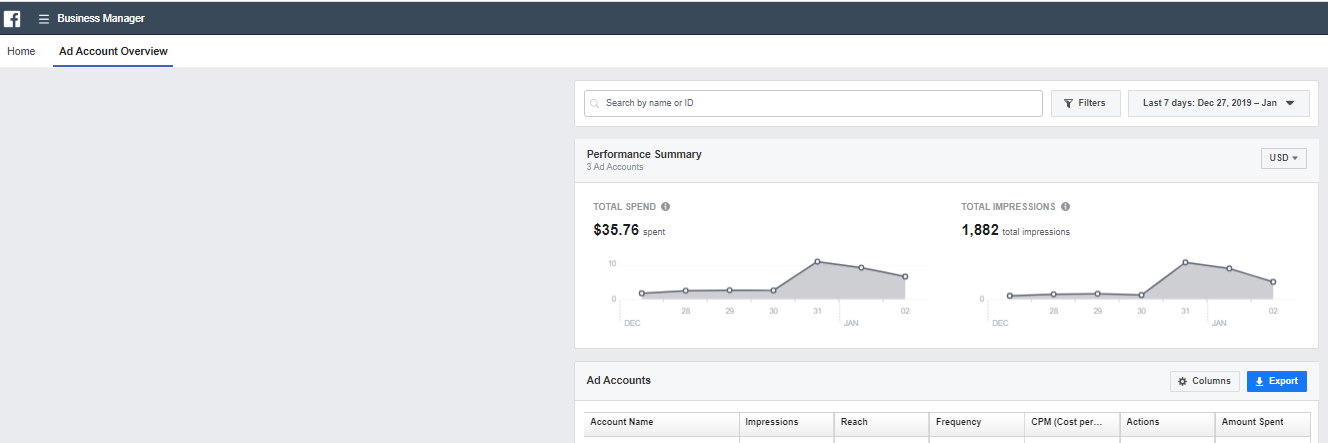
First and foremost, you want to make sure you start out in Facebook Ads Manager instead of your personal Facebook account. If your personal Facebook email is linked to your business page or business pages that you manage, you know that logging into your personal account often allows you the option to switch to your business pages. Although you can go this route, it’s often a more complicated process. Don’t login through your personal account. Instead, login at business.facebook.com. Then, either through the “Home” tab or “Ad Account Overview” tab, click on which account you’d like to create an ad for.
Step 2: Become familiar with the way Facebook Ads Manager is Set up.
Once you’re into the account you’d like to manage, take a look around. If you’re familiar with Google Ads, this type of account structure may be easy for you to understand. In Facebook Ads Manager, you’ll see 4 tabs: Account Overview, Campaigns, Ad Sets, and Ads.

The Account Overview tab is like your account’s homepage. Here you will find your account’s spending limit, insights, etc. Like in Google Ads and Analytics, the top righthand corner allows you to choose the timeframe you’d like to look at. The account overview will show you reach, spend, impressions, clicks, and audience demographics, location, etc.
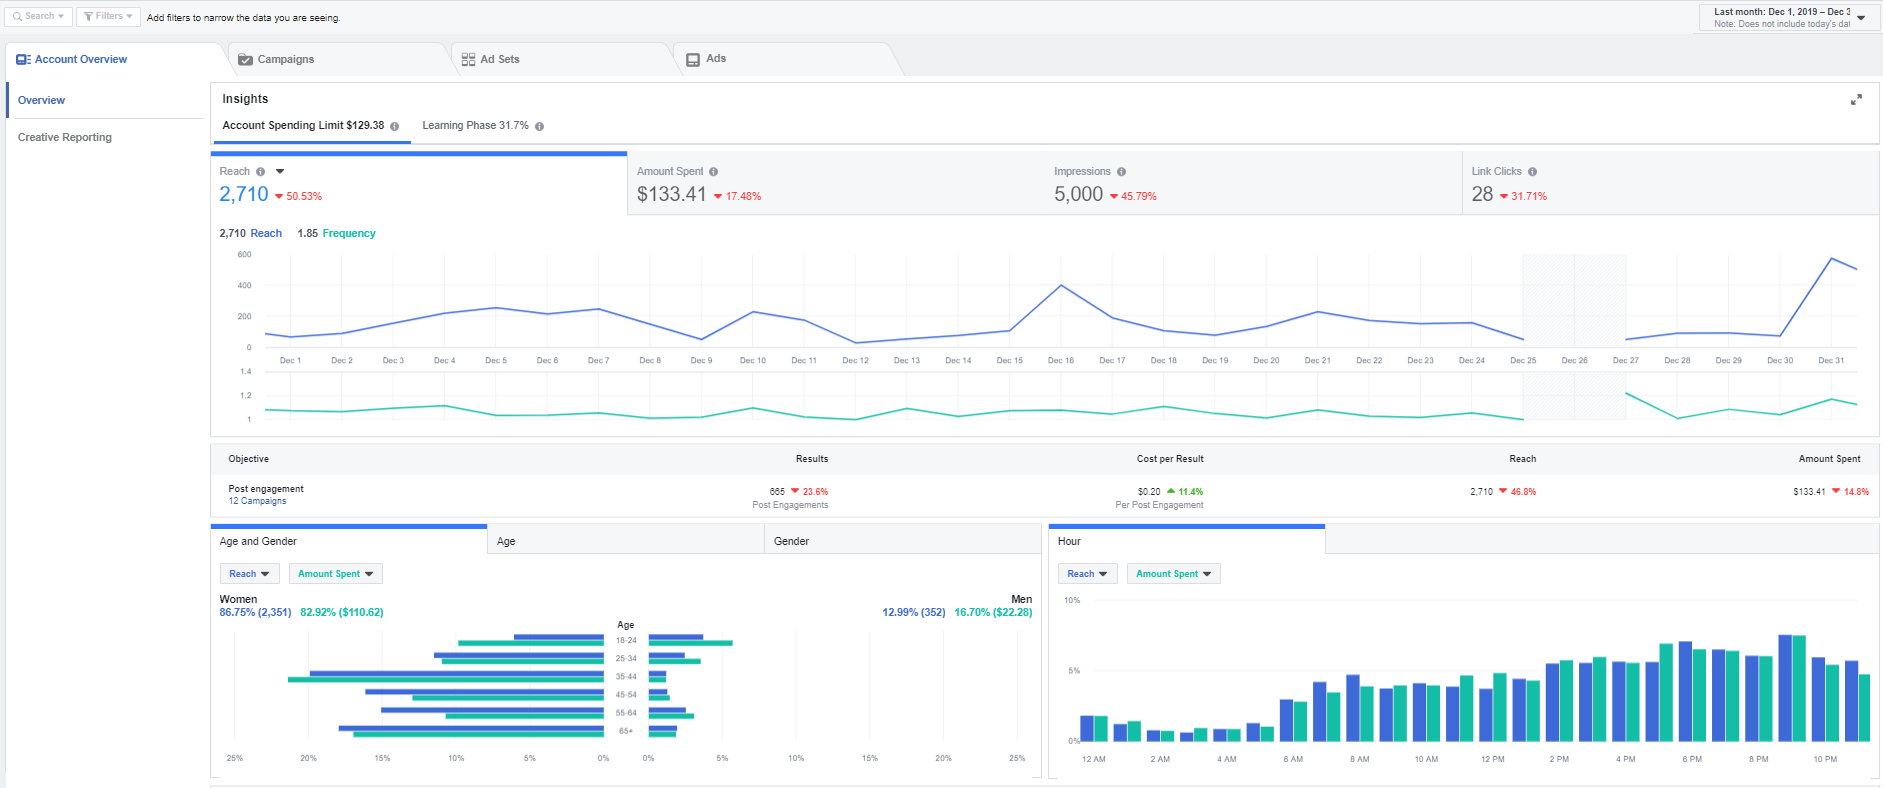
Next, you’ll see that your ads are specifically grouped into 3 tabs: Campaigns, Ad Sets, and Ads. So, what’s the difference between them?
- Campaign
The campaign is the foundation of your ad. In the Campaign tab, you’ll choose an advertising objective based on the goal of your campaign, such as sending more traffic to your website. After you choose your objective, you can start creating your ad set.

- Ad Set
An ad set groups your ads within a campaign, essentially telling them how they should run. In the Ad Set tab, you can create an audience for your ad using Facebook’s targeting options. You can either choose an existing audience you’ve created in the past or make a new audience. As always, you’ll define your audience by choosing things like location, gender, age, interests, and more. It’s important to know that if you want to test different audiences, you need to create one ad set for each audience. Within Ad sets, you not only choose your audience but also choose your ad placements and set your budget and ad schedule.

- Ads
Lastly, the final tab to know is the Ads tab. In the Ads tab, you’ll actually create and see your specific ads. This is where you choose your ad creative (image or images, video) and add details such as text, call-to-action, and header. It’s important to know that you can have multiple ads within a single ad set.

Give yourself a pat on the back! You’ve successfully learned how to navigate in Ads Manager using our Facebook Ads guide. But now what? If you need a breather, now’s the time to take one. Next, we’ll show you how to create an ad through Ads Manager.
Facebook Ads Guide: How to Create an Ad
Step 1: Go back to the Campaigns tab, then click the green “Create” button in the top left corner.

The Create button is where you’ll start creating your ads. Click Create, and then choose whether you’d like to start a new campaign or use an existing campaign. If you’re new to this, you most likely will be creating a new campaign.
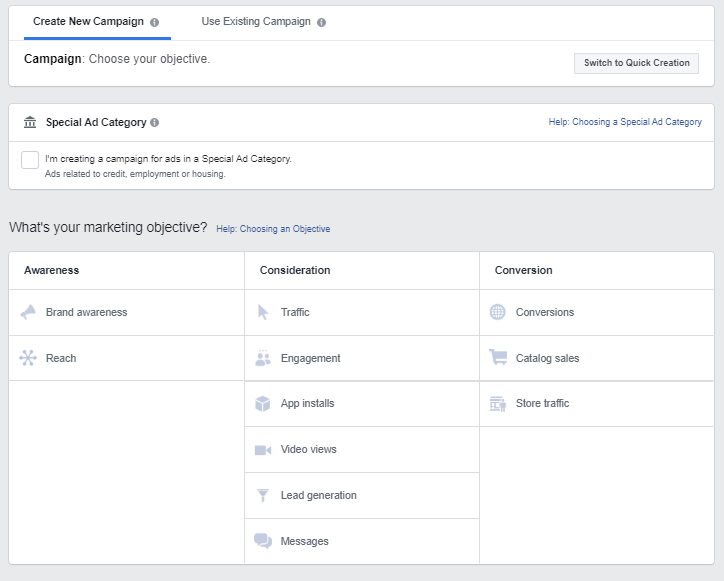
Step 2: Choose your marketing objective.
Think about the objective of your campaign and the audience you’re trying to reach. Is this purely for awareness or is your audience in the consideration or conversion stage? Within each objective, you’ll choose an even more specific objective. If you’re unsure of your objective, remember what each stage of the marketing funnel represents:
- Awareness: The moment a user first discovers your brand, product, offer, etc. In this stage, prospects that are strangers to your brand and business learn who you are. This is your opportunity to start building trust with your prospects.
- Consideration: The user is interested but not ready to make a move just yet. They’re interested in learning more about you and are willing to consider your company, services, products, etc.
- Conversion: When a user finally makes a decision (hopefully in your favor). This could mean filling out a form, buying a product, downloading an e-book, etc.
Step 3: Name your campaign and set your budget.
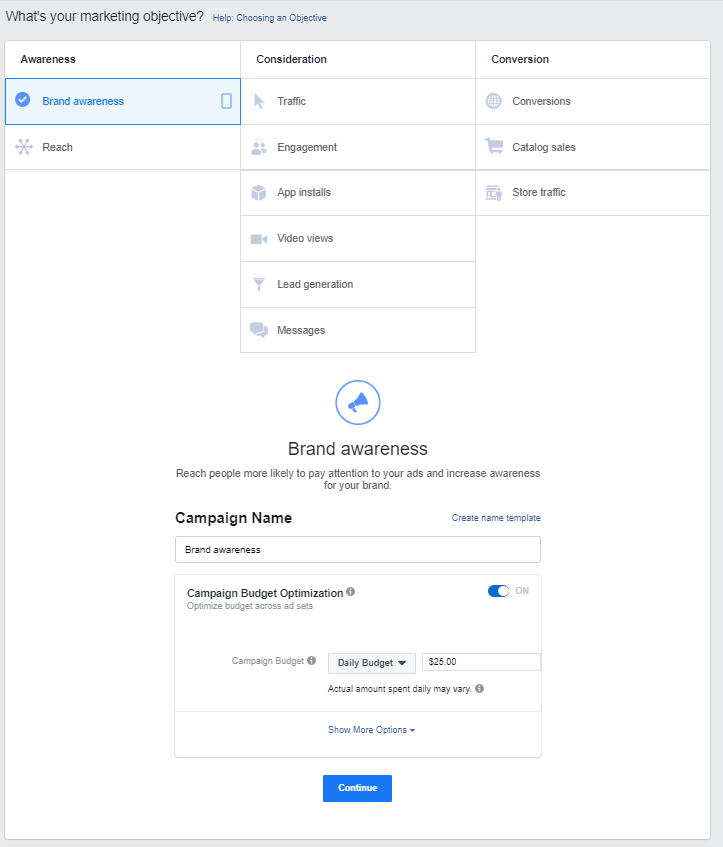
For this example, we’ve chosen Brand Awareness and set a daily budget of $25.00. You can choose between daily or lifetime budget for your ad. After you’ve finished naming your campaign and choose your budget, click Continue.
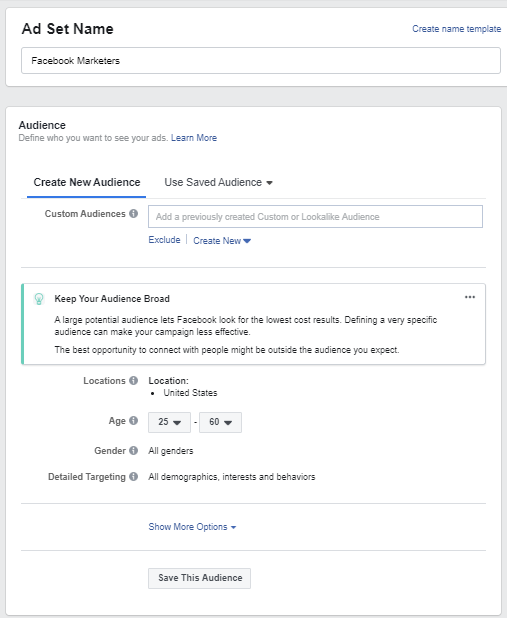
Step 4: Name your ad set, create your audience, and choose your ad placements and delivery dates.
First, you can name your ad set based on the audience you’ll be targeting. You’ll then create your audience by choosing demographics such as location, age, gender, interests, etc. You can either create a new audience or choose an existing one you may have already created. If you create a new one, make sure to click “Save this Audience.”
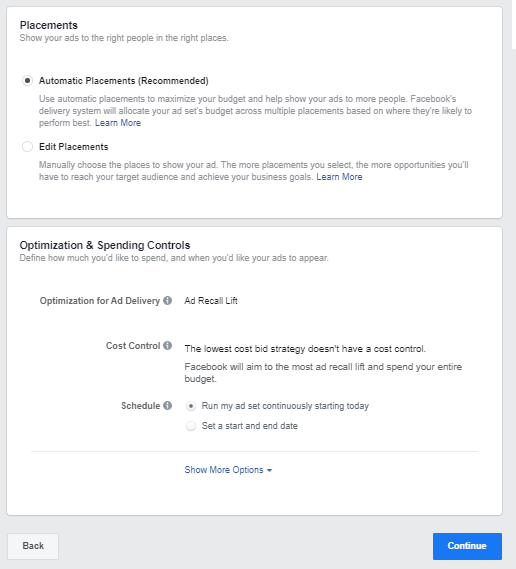
Next, choose whether you want automatic placements (the recommended and simplest option) or if you’d like to manually choose your placements. After that, set when you want your ad to run. Then click Continue.
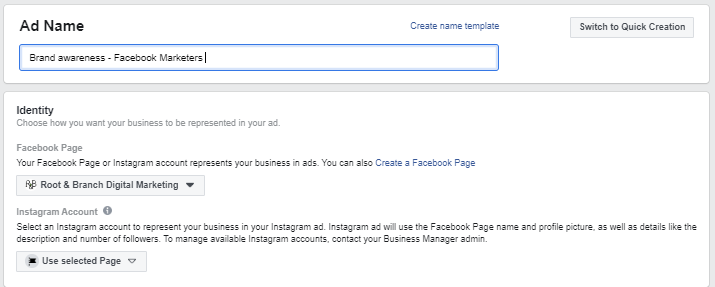
Step 5: Name and create your ad!
First, name your ad based on what makes the most sense within your campaign. Make sure you have the right Facebook Page and/or Instagram account selected for the business you’re trying to advertise for.
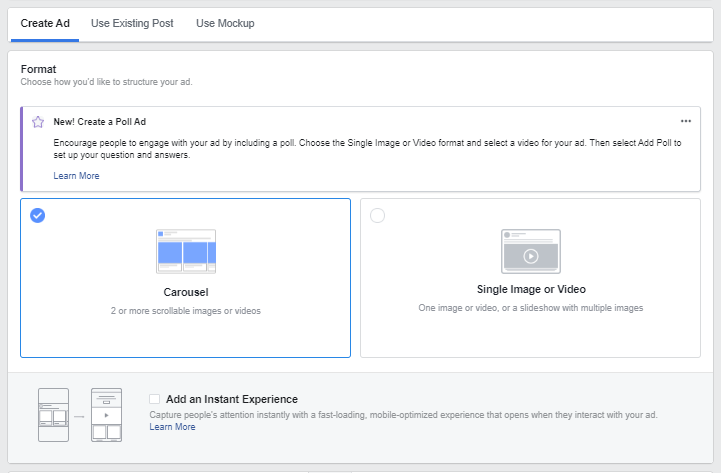
Then, you’ll create your ad. You can choose a Carousel Ad (2 or more scrollable images or video) or a single image or video.
Next, you’ll choose the image(s) or video you want to use in the ad. You’ll then add a headline, description (optional), and URL you want to lead the user to. You’ll also write the primary text shown above the ad image and choose a call-to-action. As you’re filling in all of the blanks, Facebook will show you a preview of your ad, so you can see it in action before it’s live.
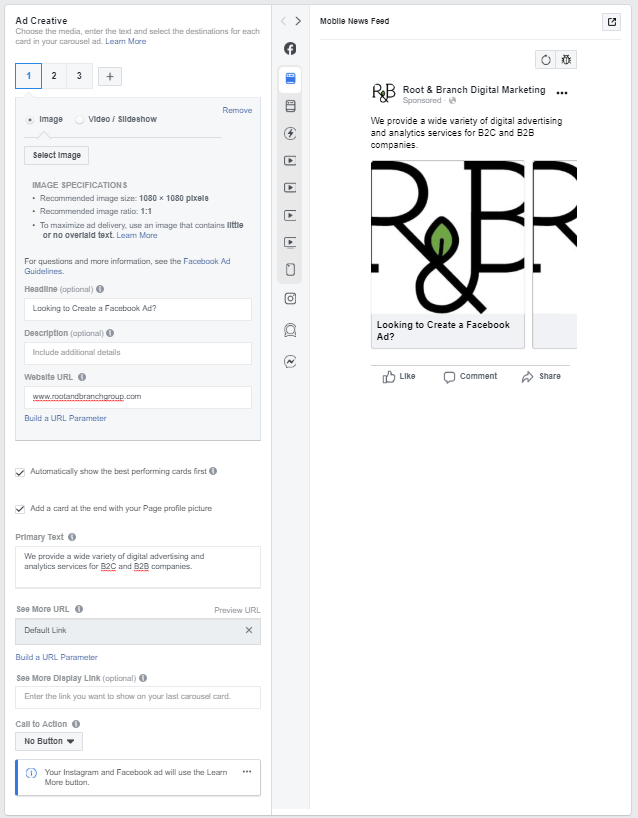
Lastly, if you have a Facebook tracking pixel set up through your account, be sure to check the pixel matches the account. Then, click “Confirm” and your ad will officially be created. You’re all set!
Now that you’ve read through our Facebook Ads guide, are you ready to create your own? If you’re still looking for help in taking your company’s social media services to the next step, we have you covered. Get in touch with our team at Root & Branch today.
Root & Branch is a digital marketing team with operations in Pittsburgh, PA and Jacksonville, NC that provides a wide variety of digital advertising and analytics services for B2C and B2B companies. Root & Branch is a certified Google Partner agency and focuses on paid search (PPC), SEO, Local SEO, digital reputation management, digital analytics, and social media management.


Leave a Reply
Want to join the discussion?Feel free to contribute!