

How to Install Google Tag Manager on WordPress
Interested in getting started with Google Tag Manager but feeling a little intimidated? Fear not! Here’s how start your GTM journey with a guide on how to install Google Tag Manager on WordPress in 5 steps.
How to Install Google Tag Manager in 5 Steps
Here is the full list of 5 steps. Below the list is additional detail (with screenshots!) for each step. Here we go!
- Create a free Tag Manager account at tagmanager.google.com (or log in to an existing account)
- Access the 2 pieces of the container code within the Admin section of Google Tag Manager
- Access the site in the back end of your WordPress site, which can be easily done by downloading and activating a free plugin called “Insert Headers and Footers”
- Copy and paste your 2 GTM container code snippets into the Header and Body of your WordPress site’s code
- Publish your Google Tag Manager container code
If you’re interested in understanding more about what you’re actually going to be doing, check out the Key Vocabulary immediately below. Otherwise skip down to Step 1!
Google Tag Manager Key Vocabulary
Understanding what a container code is, the two primary functions of Tag Manager, and what event tracking means will help to make sense of GTM.
What is a Container Code?
A container code (or container tag, or simply container) is a piece of code that is placed directly onto a website. The container removes the need for other tracking codes to be placed directly on the site because those other tracking codes can be pushed to the site via the published GTM container, through tagmanager.google.com. When working in Google Tag Manager, you are working in the GTM container.
In the case of GTM, there are two different elements of the container code snippet. The javascript (.js) code snippet goes in the Header of the site. The non javascript code (noscript) goes in the Body of the site. More on that below.
What Does Google Tag Manager Do?
Since the GTM container code can consolidate all other tags on the site, Google Tag Manager can streamline all code snippets or “tags” that would otherwise be placed directly on the site. It makes management simpler and can reduce the risk of mistakes in the site’s source code. This is why it’s called a “tag manager”, get it?
Google Tag Manager also enables some more advanced Google Analytics tracking and measurement techniques like link click tracking, scroll depth tracking, timer tracking, and other “events” that can’t be tracked through an out of the box installation of Google Analytics.
What Does Event Tracking Mean?
To understand events, we first need to understand what a “hit” is and how that relates to what is tracked in Google Analytics.
A hit is a specific interaction between a user and the website that is tracked. Hits are created when user’s specific behavior triggers the tracking code placed on the site. The interaction data is recorded and then packaged into a “hit” that is then sent to Google Analytics. By default, Google Analytics tracks “Pageview hits,” which are the only kind of hits that are automatically measured every time a user’s page loads.
To keep things as simple as possible, we can define “events” as other user interactions that would not be otherwise recorded by the default Pageview hit. That could include things like button clicks (that don’t redirect to a new URL), playing a video, downloading a form, or scrolling on the page.
Event tracking, therefore, is using Google Tag Manager to identify and record the specific event hits that we identify. And to set up event tracking we first need to install Google Tag Manager on our WordPress site. Onward!
The 5 Steps to Installing GTM (With Pictures)
1.) Create A Free Google Tag Manager account
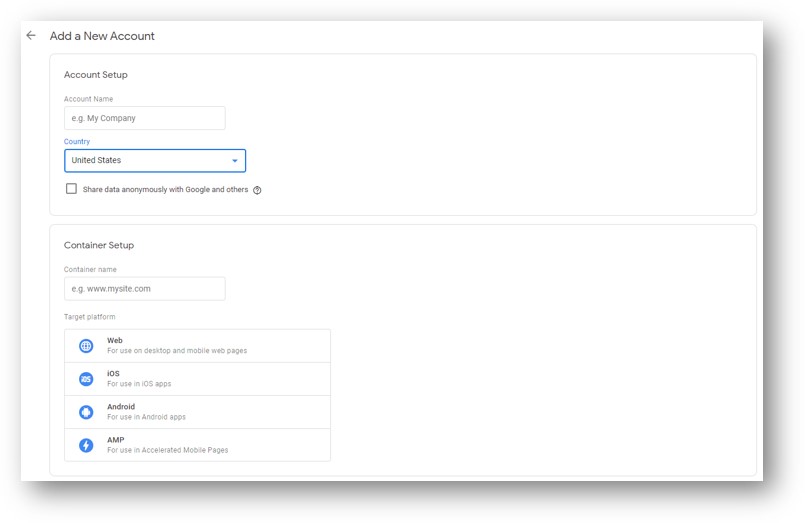
Like many of the Google platforms, Tag Manager is free to use. Head on over to tagmanager.google.com and add a new account.
As you can see below, all you’ll need is a name for your account, a country, the URL for the web property, and the type of of property you want to track. If it’s a website (which we’ll assume for this WordPress exercise), select “Web.” That’s all there is to it.
2.) Access the Tag Manager Container Code
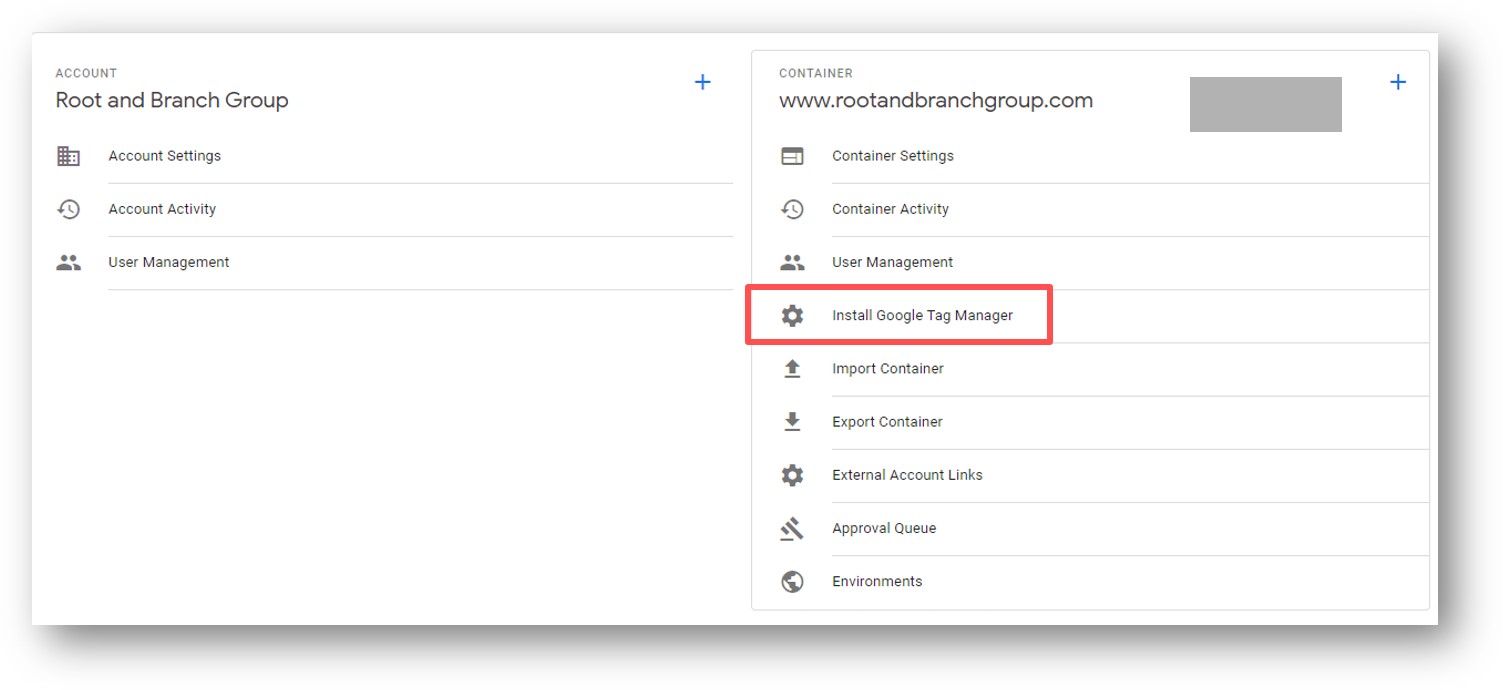
Within the Tag Manager account, select the “Admin” heading at the top of the page to view Account Settings (on the left column in the screenshot below) and Container Settings (on the right column below).
Hit the gear icon to “Install Google Tag Manager” under the Container Settings on the right side of the screen as shown in the red box.
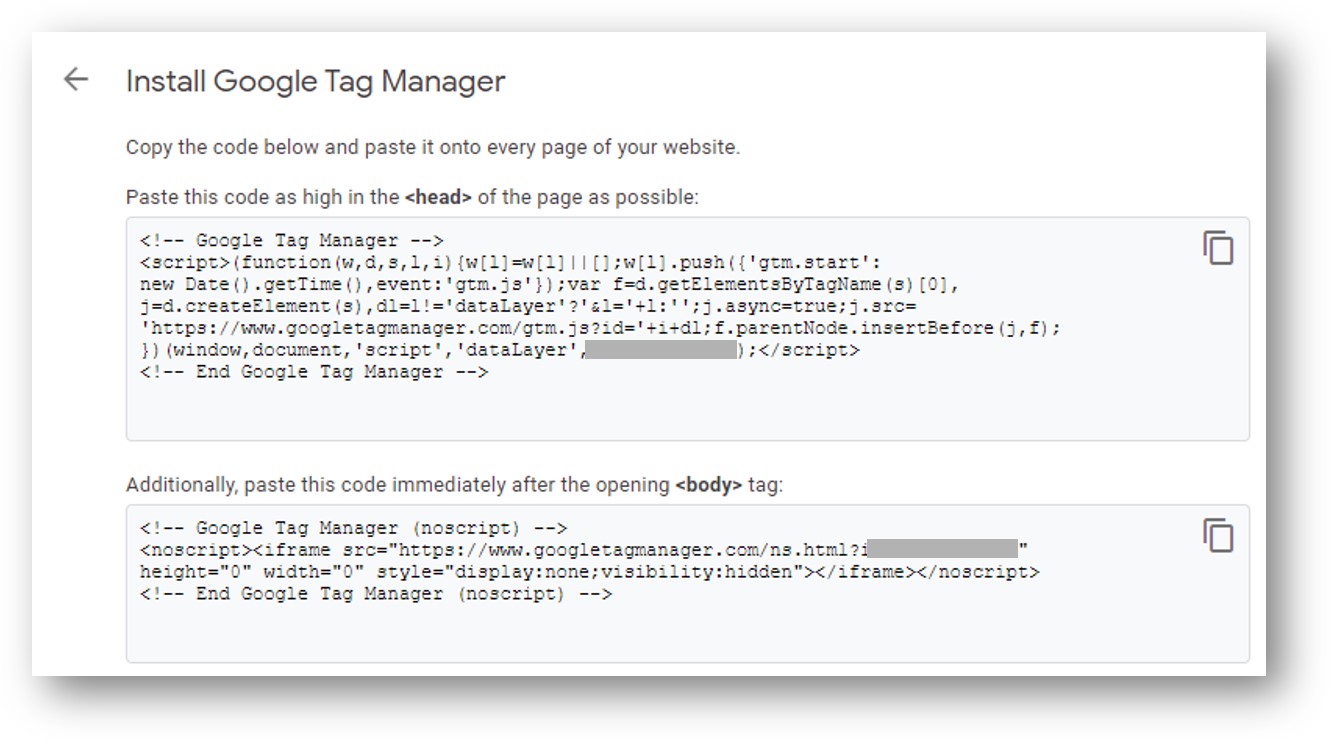
You’ll see the 2 Google Tag Manager container code snippets as shown below. The first code snippet goes in the header (Head) of the site. This is JavaScript code that loads your container onto the web page. The code tells your page to load the container asynchronously, so that the rest of the page will continue to load without waiting for GTM to finish first.
The second part of the code is a “no script” tag, as you can see by the (noscript) immediately to right of ‘Google Tag Manager.’ This is the backup code. It only comes into play in the very rare situation where a user does not have JavaScript enabled (noscript, remember?). This piece of code goes in the body of the site source code, and instructs web browsers to render the container code in an iframe for users without JavaScript. Over 99.9% of users have JavaScript enabled, so this covers a very small subset of users.
Alright, it’s almost time to do some copying and pasting with those head and body container code snippets, but first let’s head over to the back-end of our WordPress site!
3.) Download and Activate Insert Headers and Footers Plugin
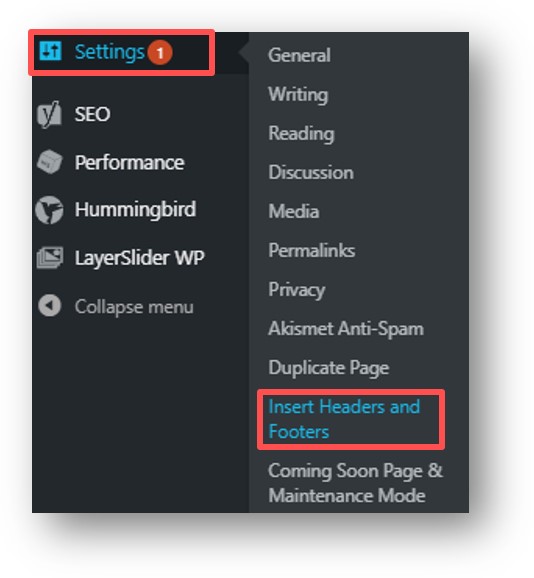
If you’re very comfortable with editing your WordPress theme and can talk intelligently about PHP vs. HTML without getting scared, you can skip this step and dig right on in to your source code. For the rest of us, we’re going to use a free WordPress plugin called Insert Headers and Footers to easily insert codes in the header, body, and footer of the site.
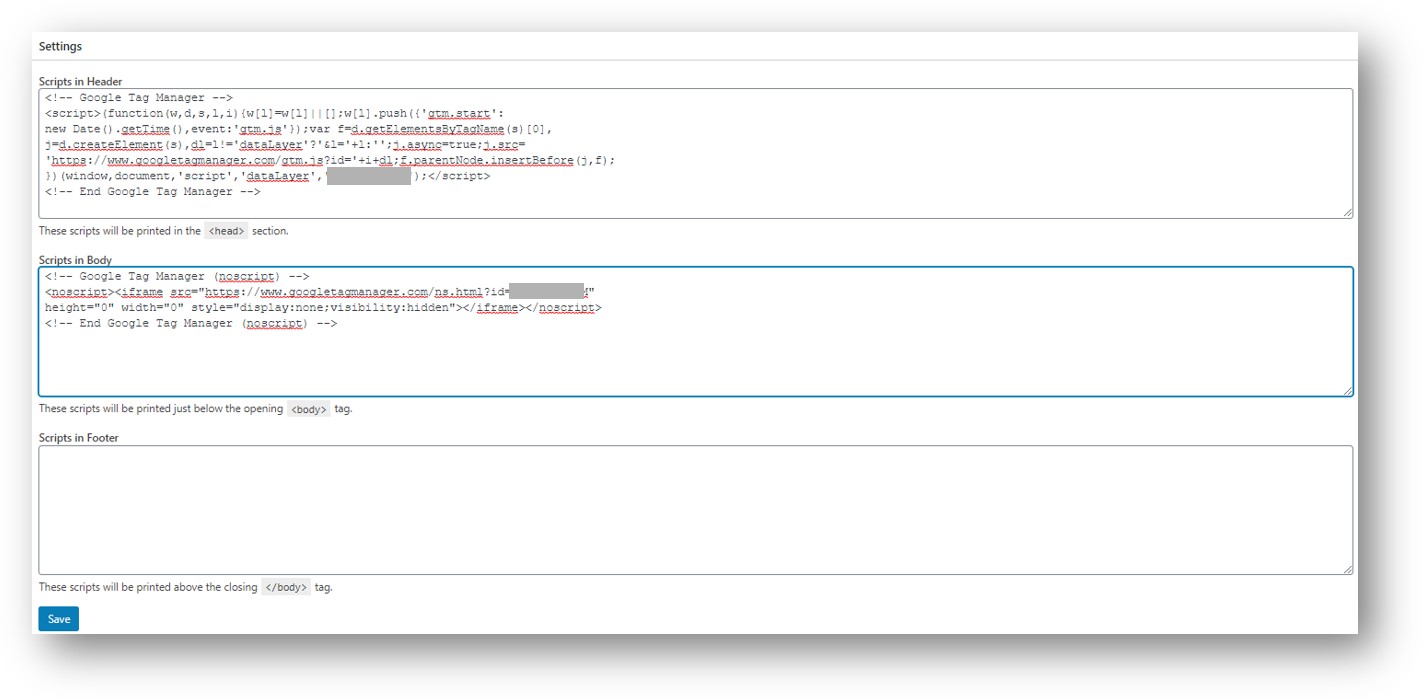
It’s a free plugin with over 1 million active downloads, but certainly feel free to investigate to make sure you feel good about adding it your site. Once you download and activate the plugin, you’ll be able to “Insert Headers and Footers” through the Settings of your site as shown below.
4.) Copy and Paste Your Container Code Snippets Into Your WordPress Site
Now, grab those container code snippets that we accessed in step 2 and copy and paste them into your Header and Footer. Check it out below. Not too hard, was it?
You could also use this plugin to paste other code snippets on your site, but since you’re now using GTM, you’ll be able to use Tag Manager to do that!
Save and publish your site.
5.) Go Back to Tag Manager and Publish Your Container Code
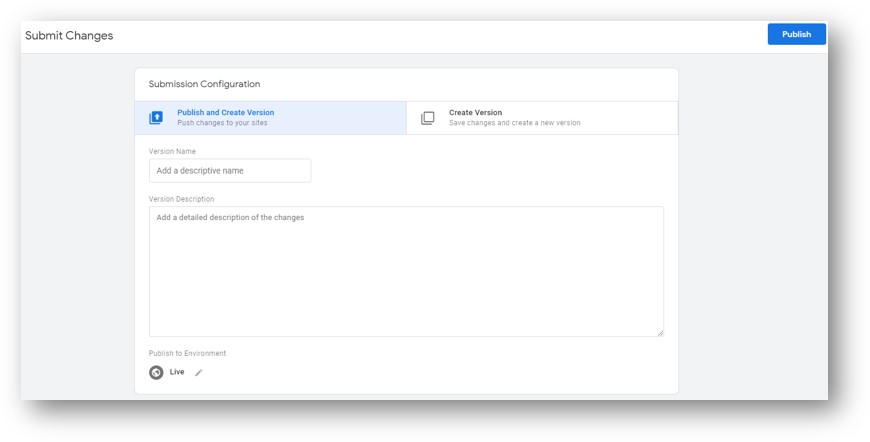
Click over from the “Admin” header of Google Tag Manager to the “Workspace” header. There are only 3 of those sections at the top of the page so it shouldn’t be too tough to find. Move over to your Workspace in Google Tag Manager, and you’ll see a blue “Submit” button in the top right-hand side of your screen. Hit that button.
You’re about to publish your container on the site and you’ll see the “Submission Configuration” screen below. You can give this version of your container a name and can also add notes to record what you did for record keeping.
Once you’re done with any notes, hit the blue “Publish” button as shown below.
You’ve now installed Google Tag Manager on your WordPress site. You now have the infrastructure in place to set up event tracking and deploy your other tags. You haven’t done that yet (right now, you have an empty GTM container code published to your WordPress site), but you’ve taken a very important first step.
What Next?
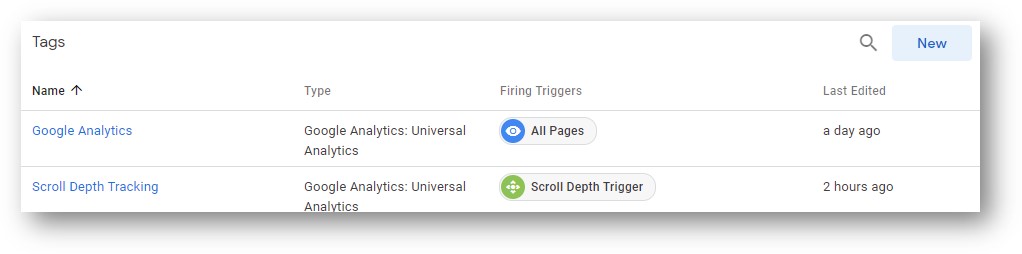
We’ll write another blog to detail how to use tags and triggers to deploy your Google Analytics tracking code through GTM and to set up events like scroll depth tracking (below).
You could also head on over to Analytics Academy and get yourself a free certification in Google Tag Manager Fundamentals. Or just take a minute for a break to feel awesome about your newfound knowledge of how to install Google Tag Manager on WordPress!
And if we can help with tips on SEO writing or digital marketing training, feel free to get in touch.


Trackbacks & Pingbacks
[…] track internal link clicks you’ll first want to make sure Google Tag Manager is running on your […]
[…] This 4 minute video shows how to set up and install Google Tag Manager on a WordPress site. Or you can click to read how to quickly add Google Tag Manager to WordPress. […]
[…] need to have a Google Tag Manager container code installed on your website. Here’s how to install GTM if you don’t have that up and running […]
[…] need to have a Google Tag Manager container code installed on your website. Here’s how to install GTM if you don’t have that up and running […]
[…] the way, I’m assuming you know more than I did and have correctly installed GTM and understand all about the basics of tags and triggers. If not, check the preceding links. […]
[…] have Google Tag Manager, here’s a guide to setting that up on your WordPress site: https://www.rootandbranchgroup.com/how-to-install-google-tag-manager-on-wordpress/. And you can watch this video to understand the basics of Tag Manager (How Tags and Triggers Work) […]
[…] be. It is helpful with UA, and I believe is even more important now with GA4. Here’s how to install GTM on WordPress if you need any […]
[…] Like many of the more useful tracking options in Google Analytics, we need Google Tag Manager for Google Analytics link tracking. In other words, it won’t work if you aren’t using GTM in conjunction with Universal Analytics or GA4. If you aren’t currently using Tag Manager, you can head over here and learn how to deploy GTM on your WordPress site. […]
[…] and our tag. If you are not currently using Google Tag Manager, you can check out this guide to set up Tag Manager on your WordPress […]
[…] This particular Google Analytics spam filter only works based on the unique container code ID associated with your Tag Manager container. In other words, it won’t work if you aren’t using GTM in conjunction with Universal Analytics. You will need to use GTM to deploy your GA (UA) tag on your site. If that doesn’t sound like your setup, you can head over here and learn how to deploy GTM on your WordPress site. […]
Leave a Reply
Want to join the discussion?Feel free to contribute!